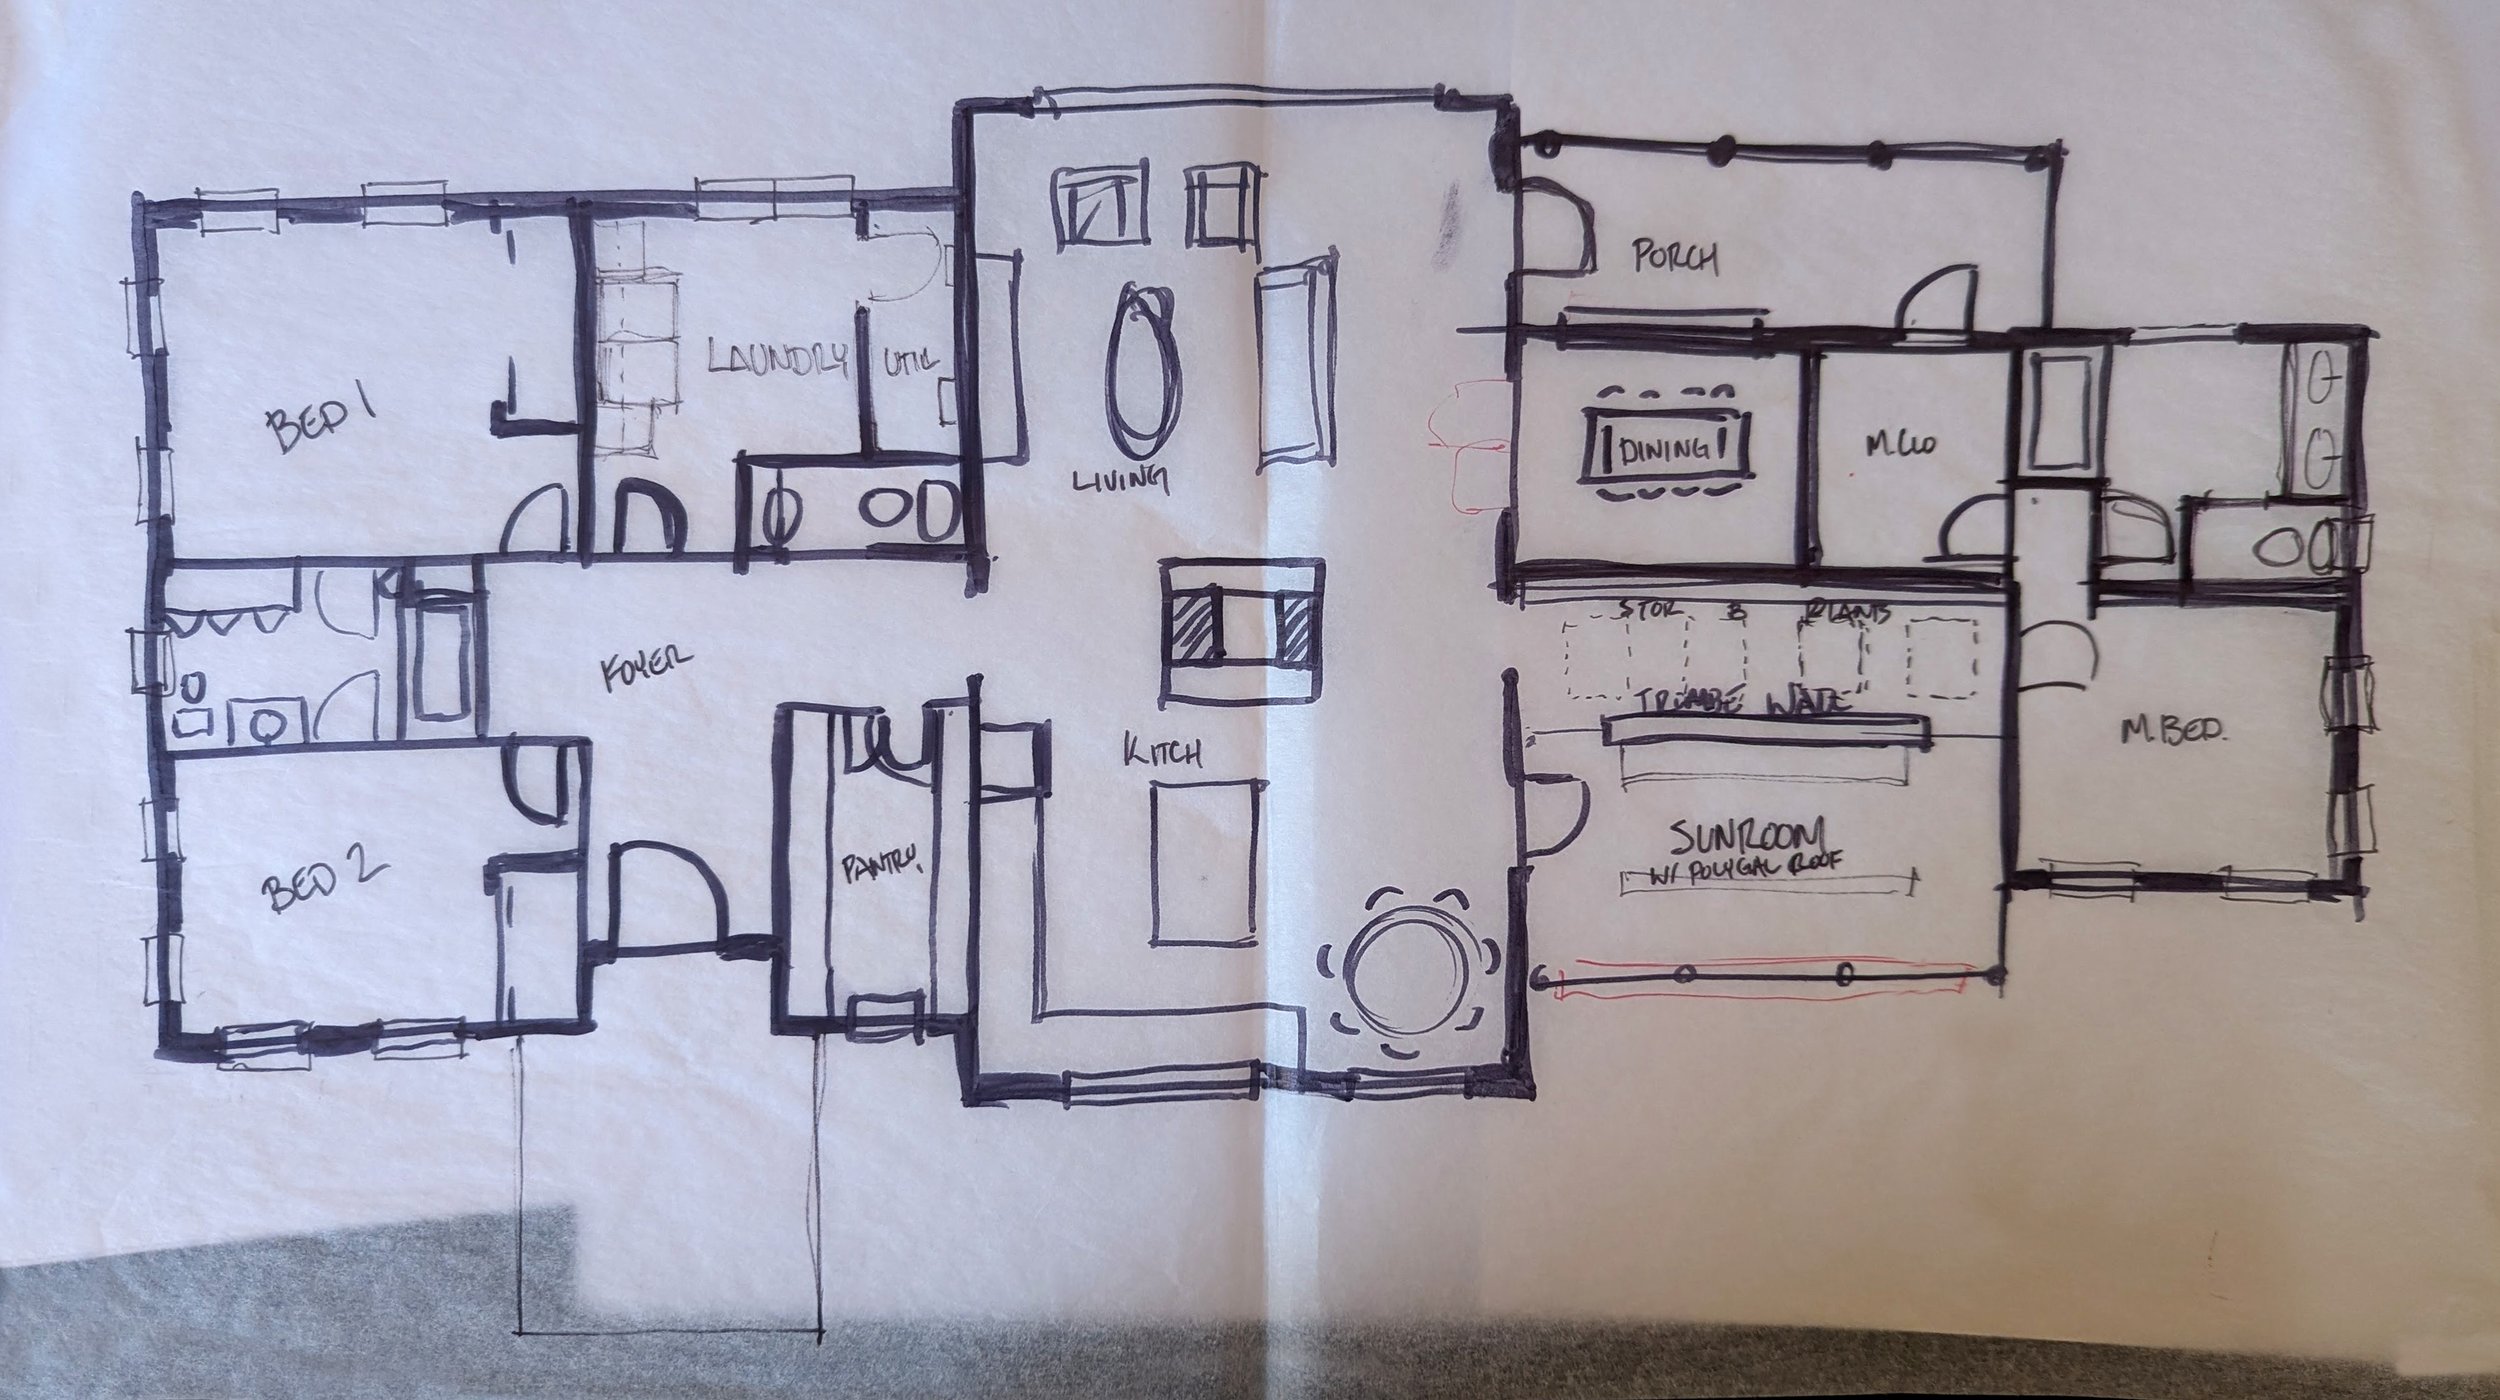
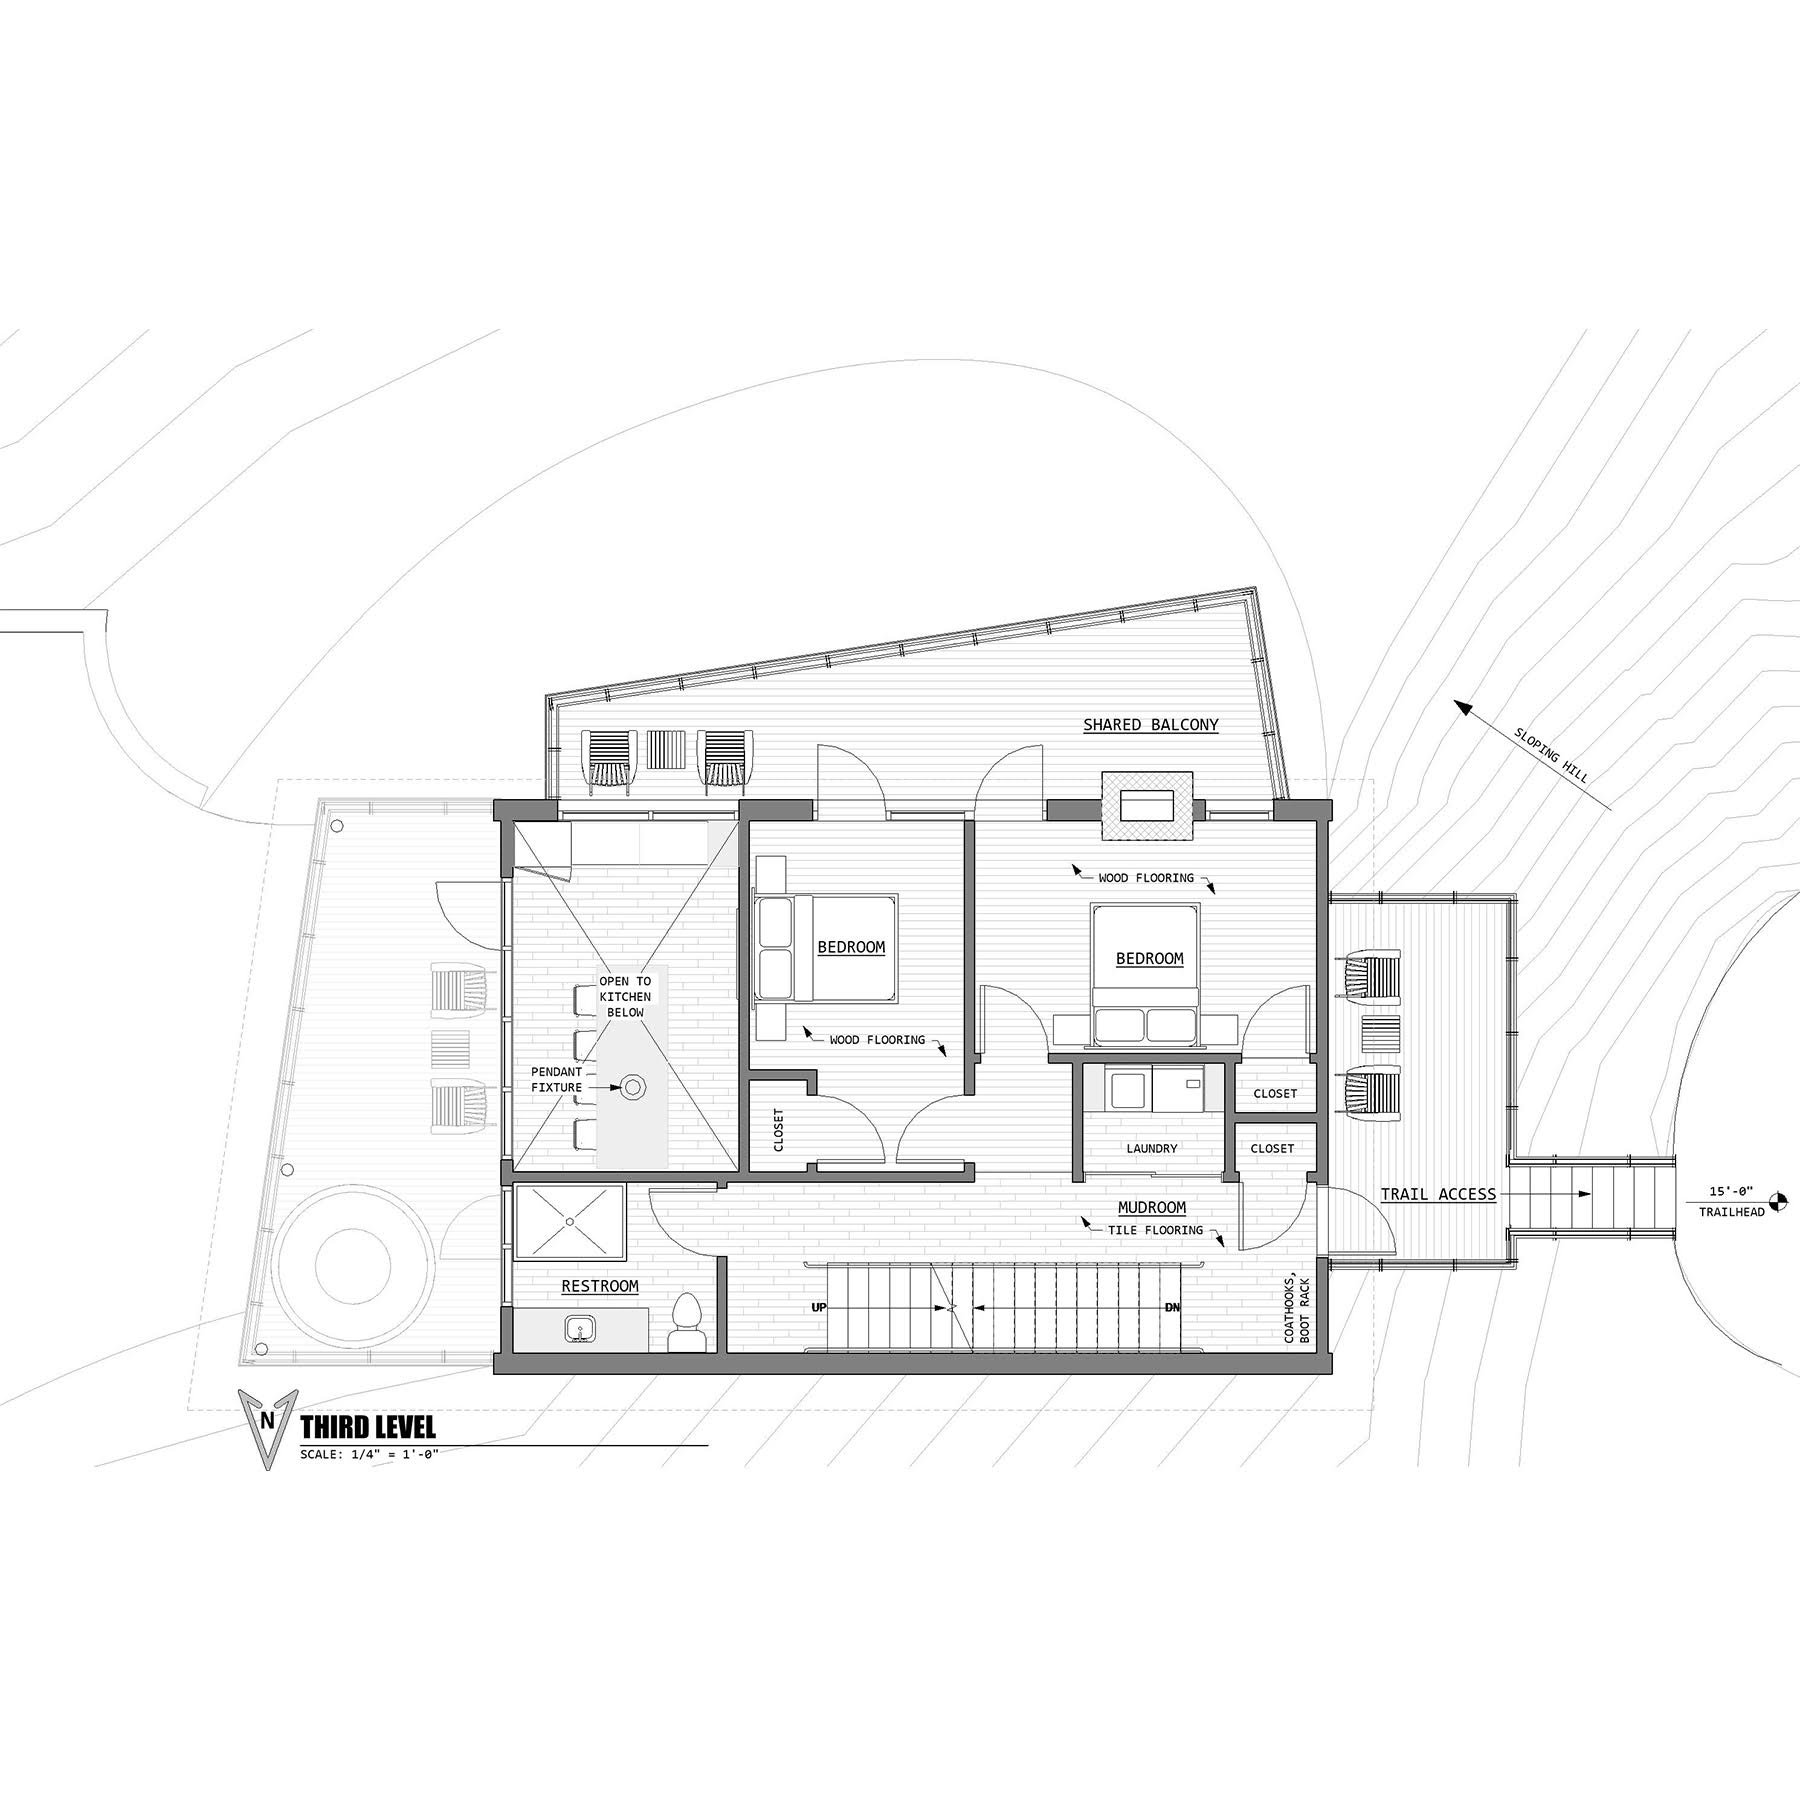
This design is part of a series of quick ‘study’ home proposals made over the years. Click here to see the full series of these designs.


This design is part of a series of quick ‘study’ home proposals made over the years. Click here to see the full series of these designs.
This design is part of a series of quick ‘study’ home proposals made over the years. Click here to see the full series of these designs.
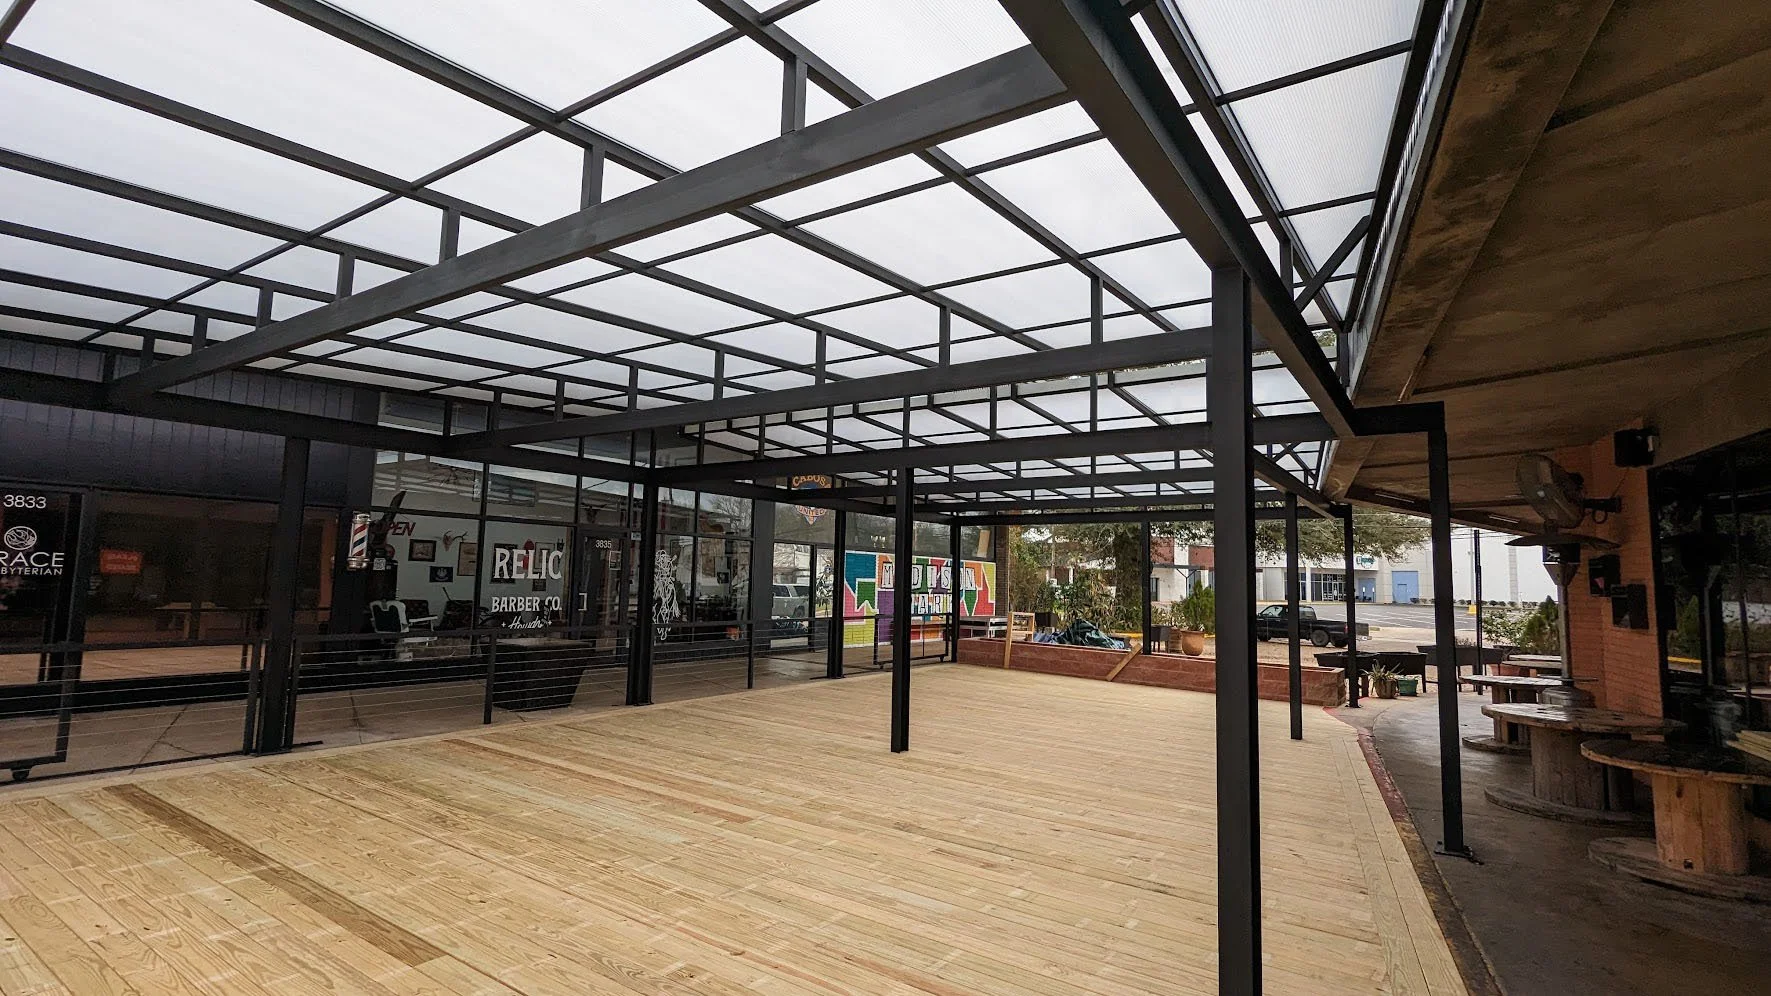
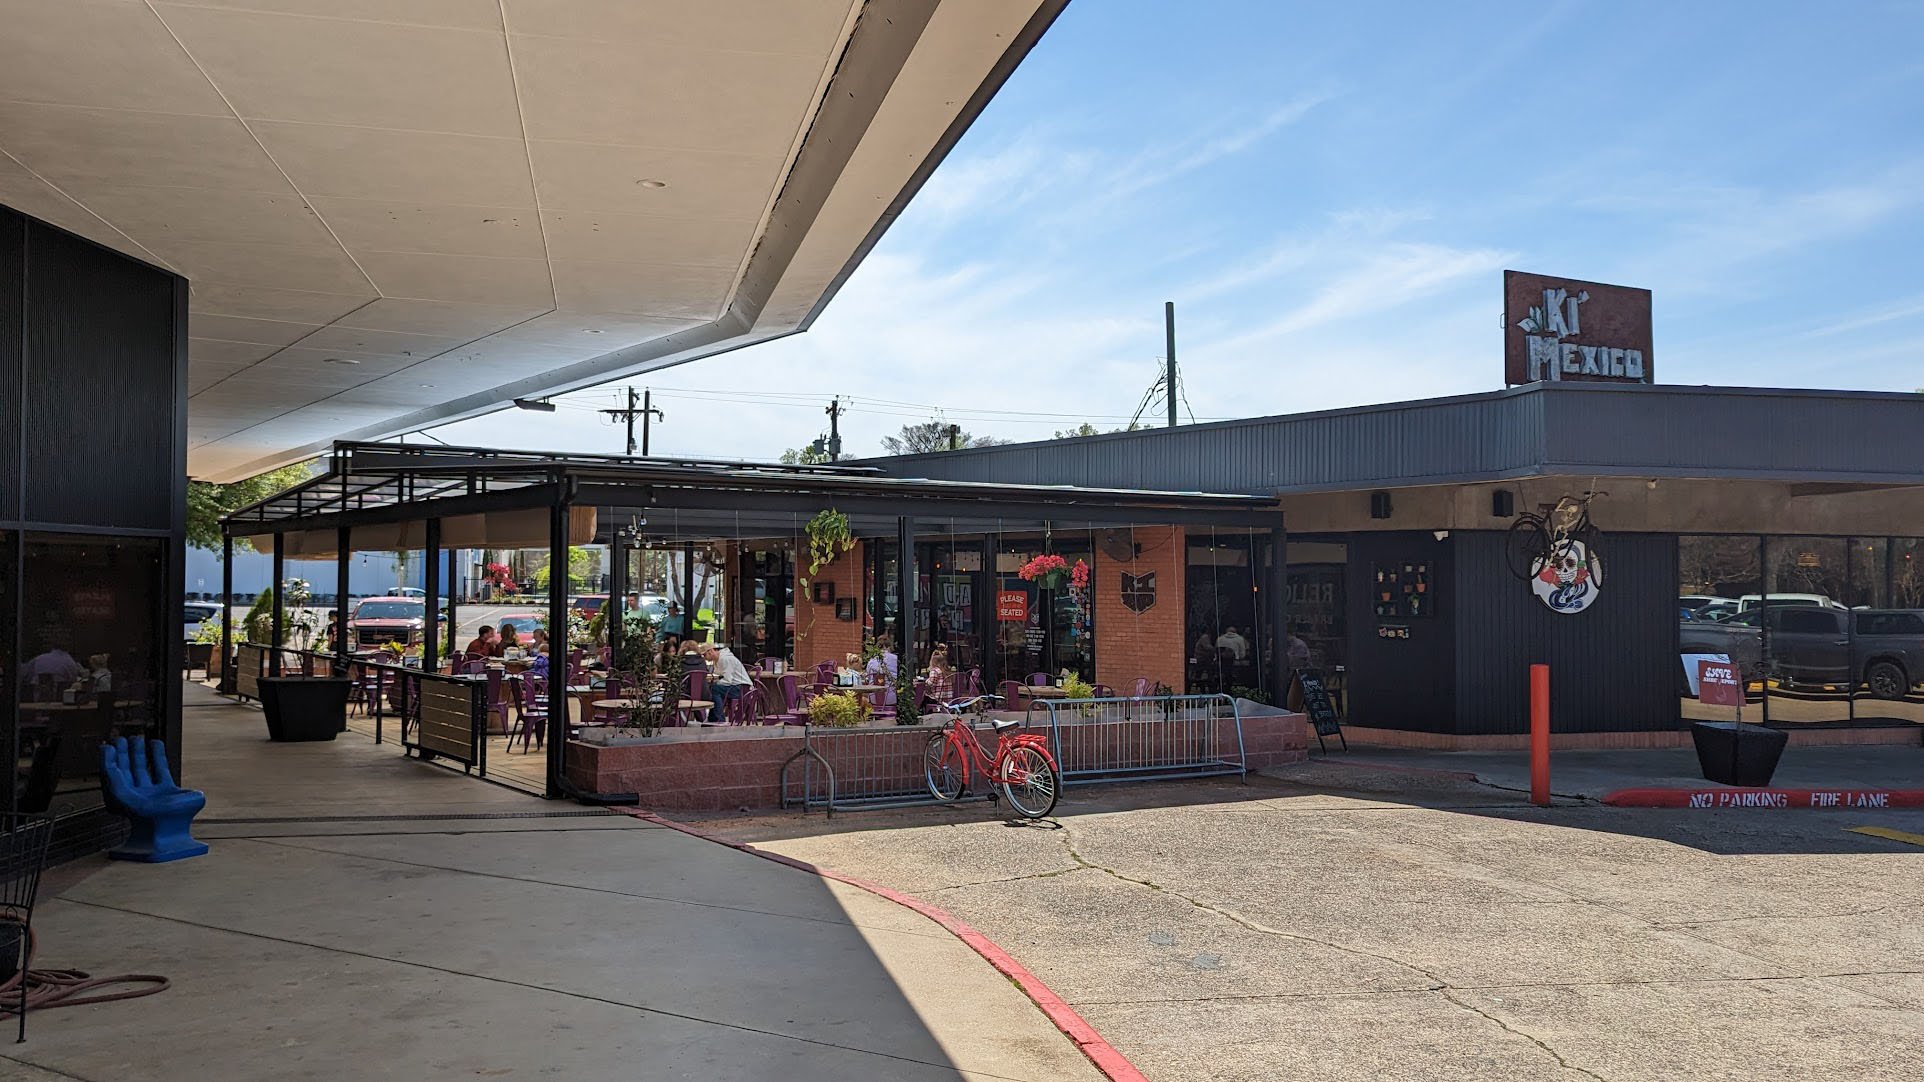
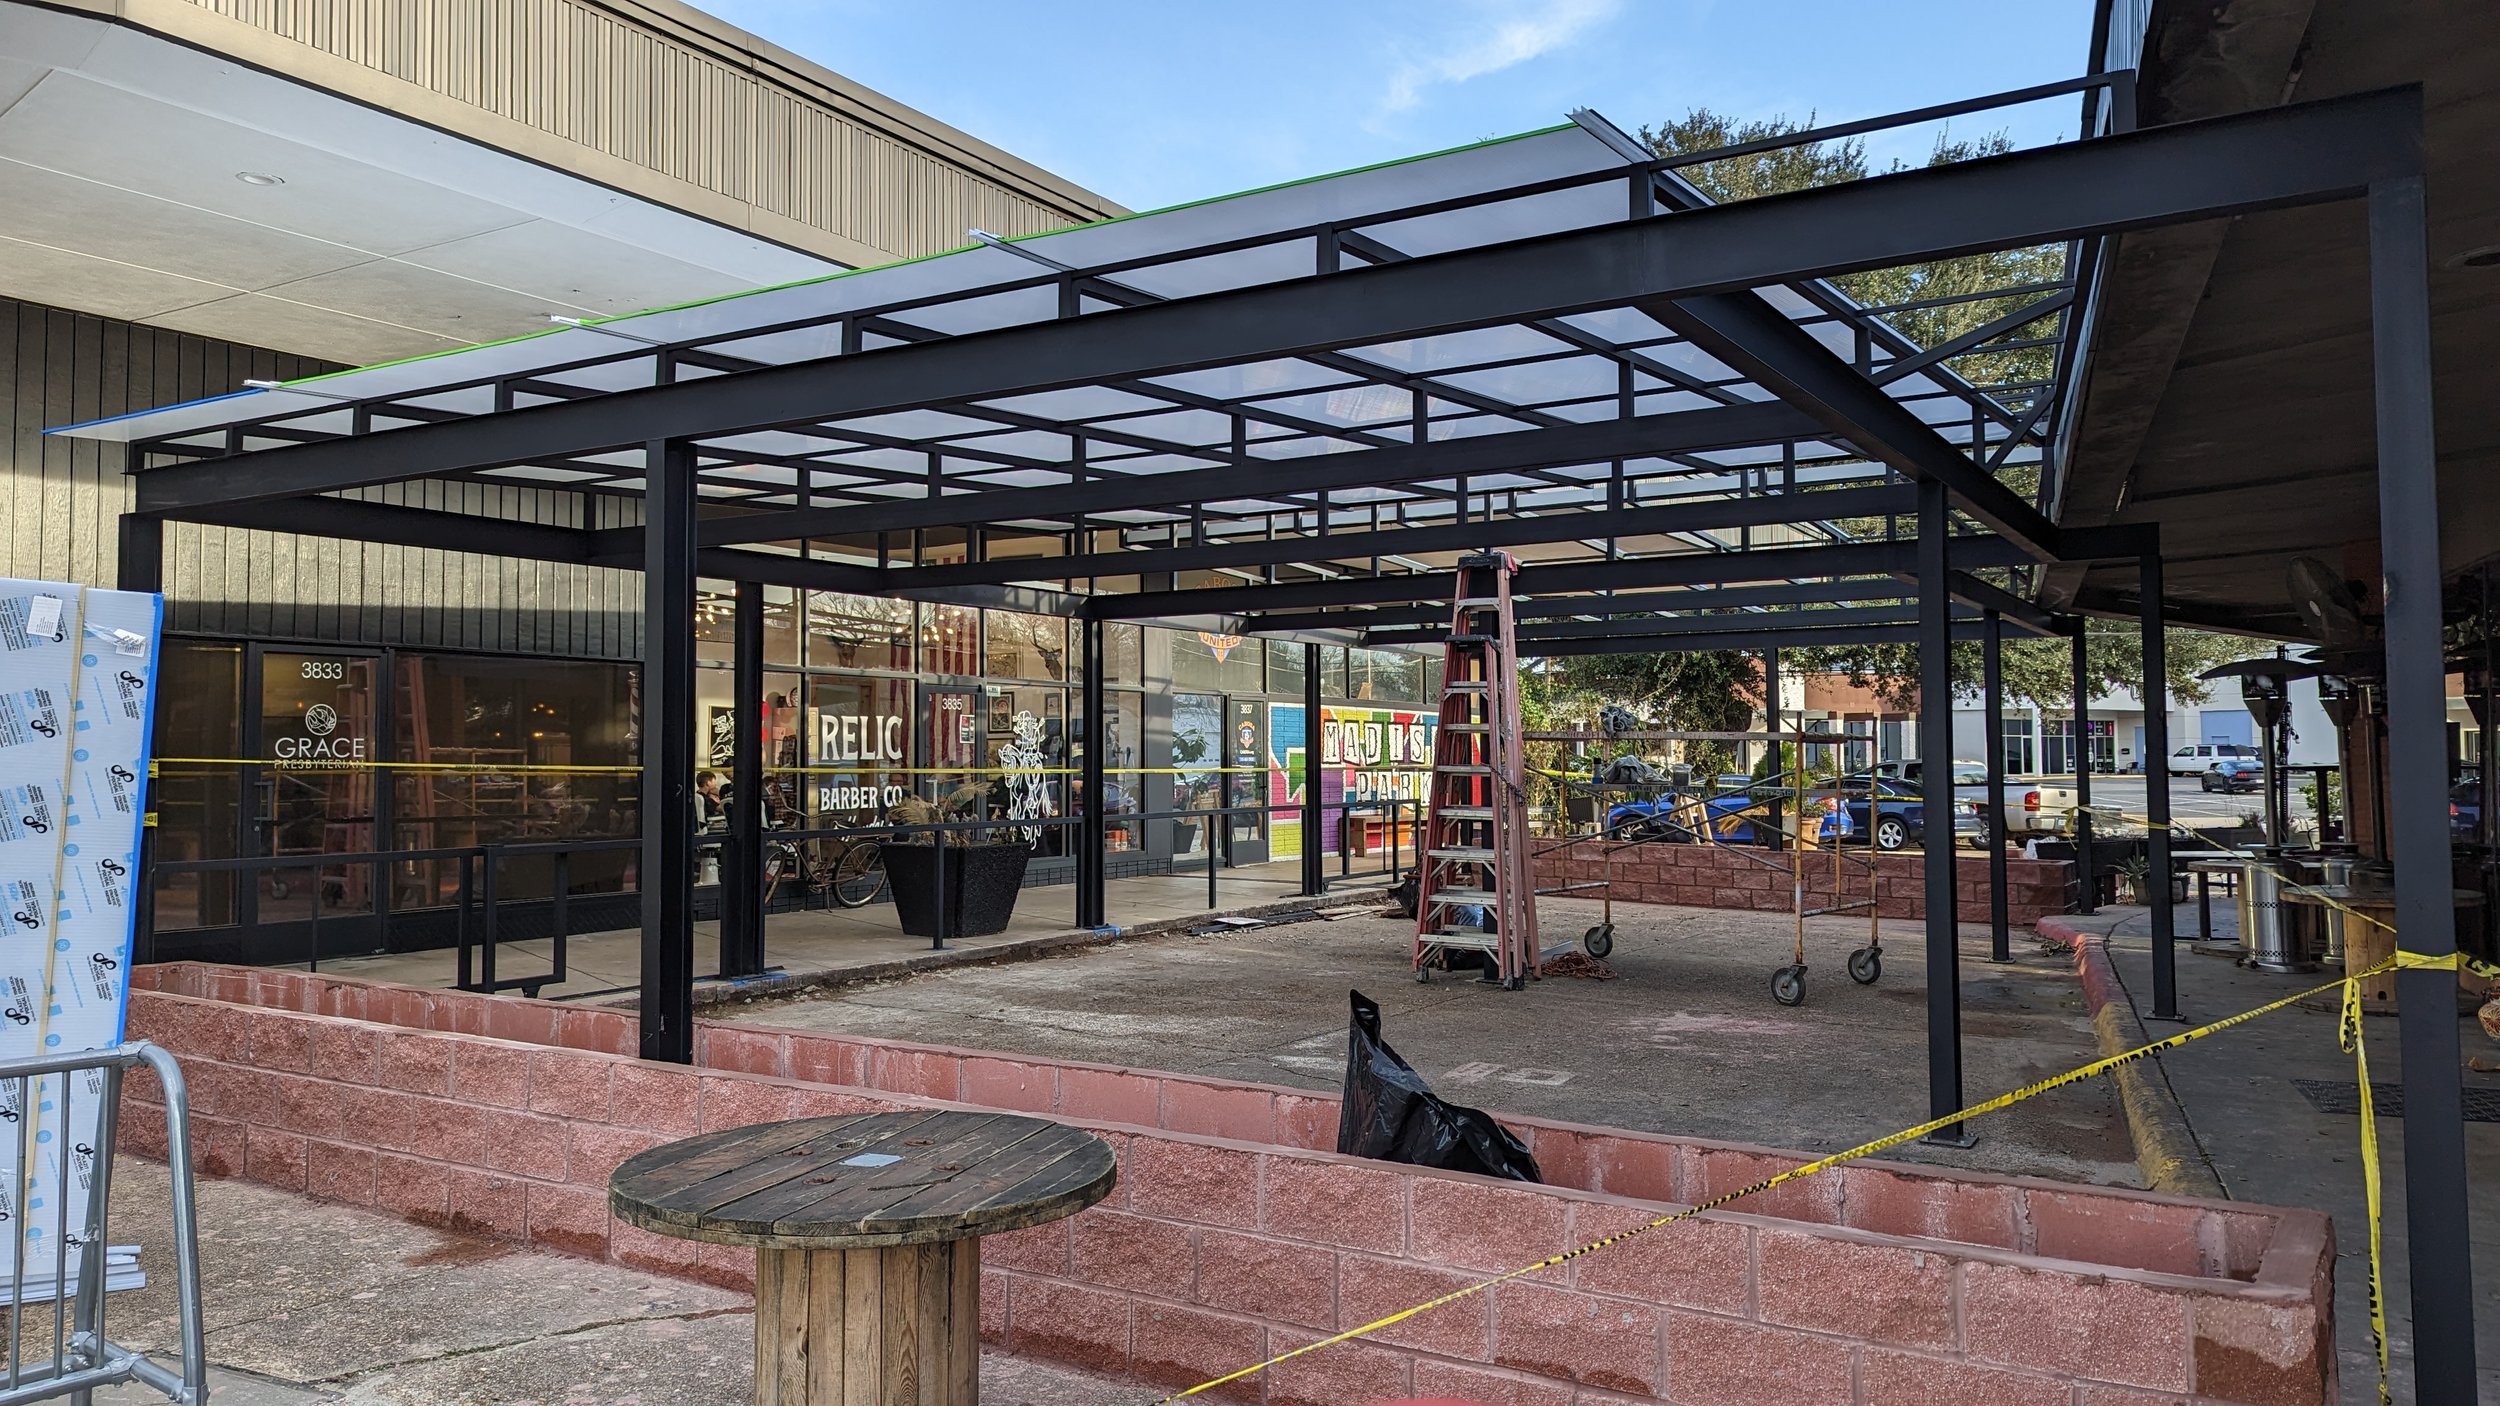
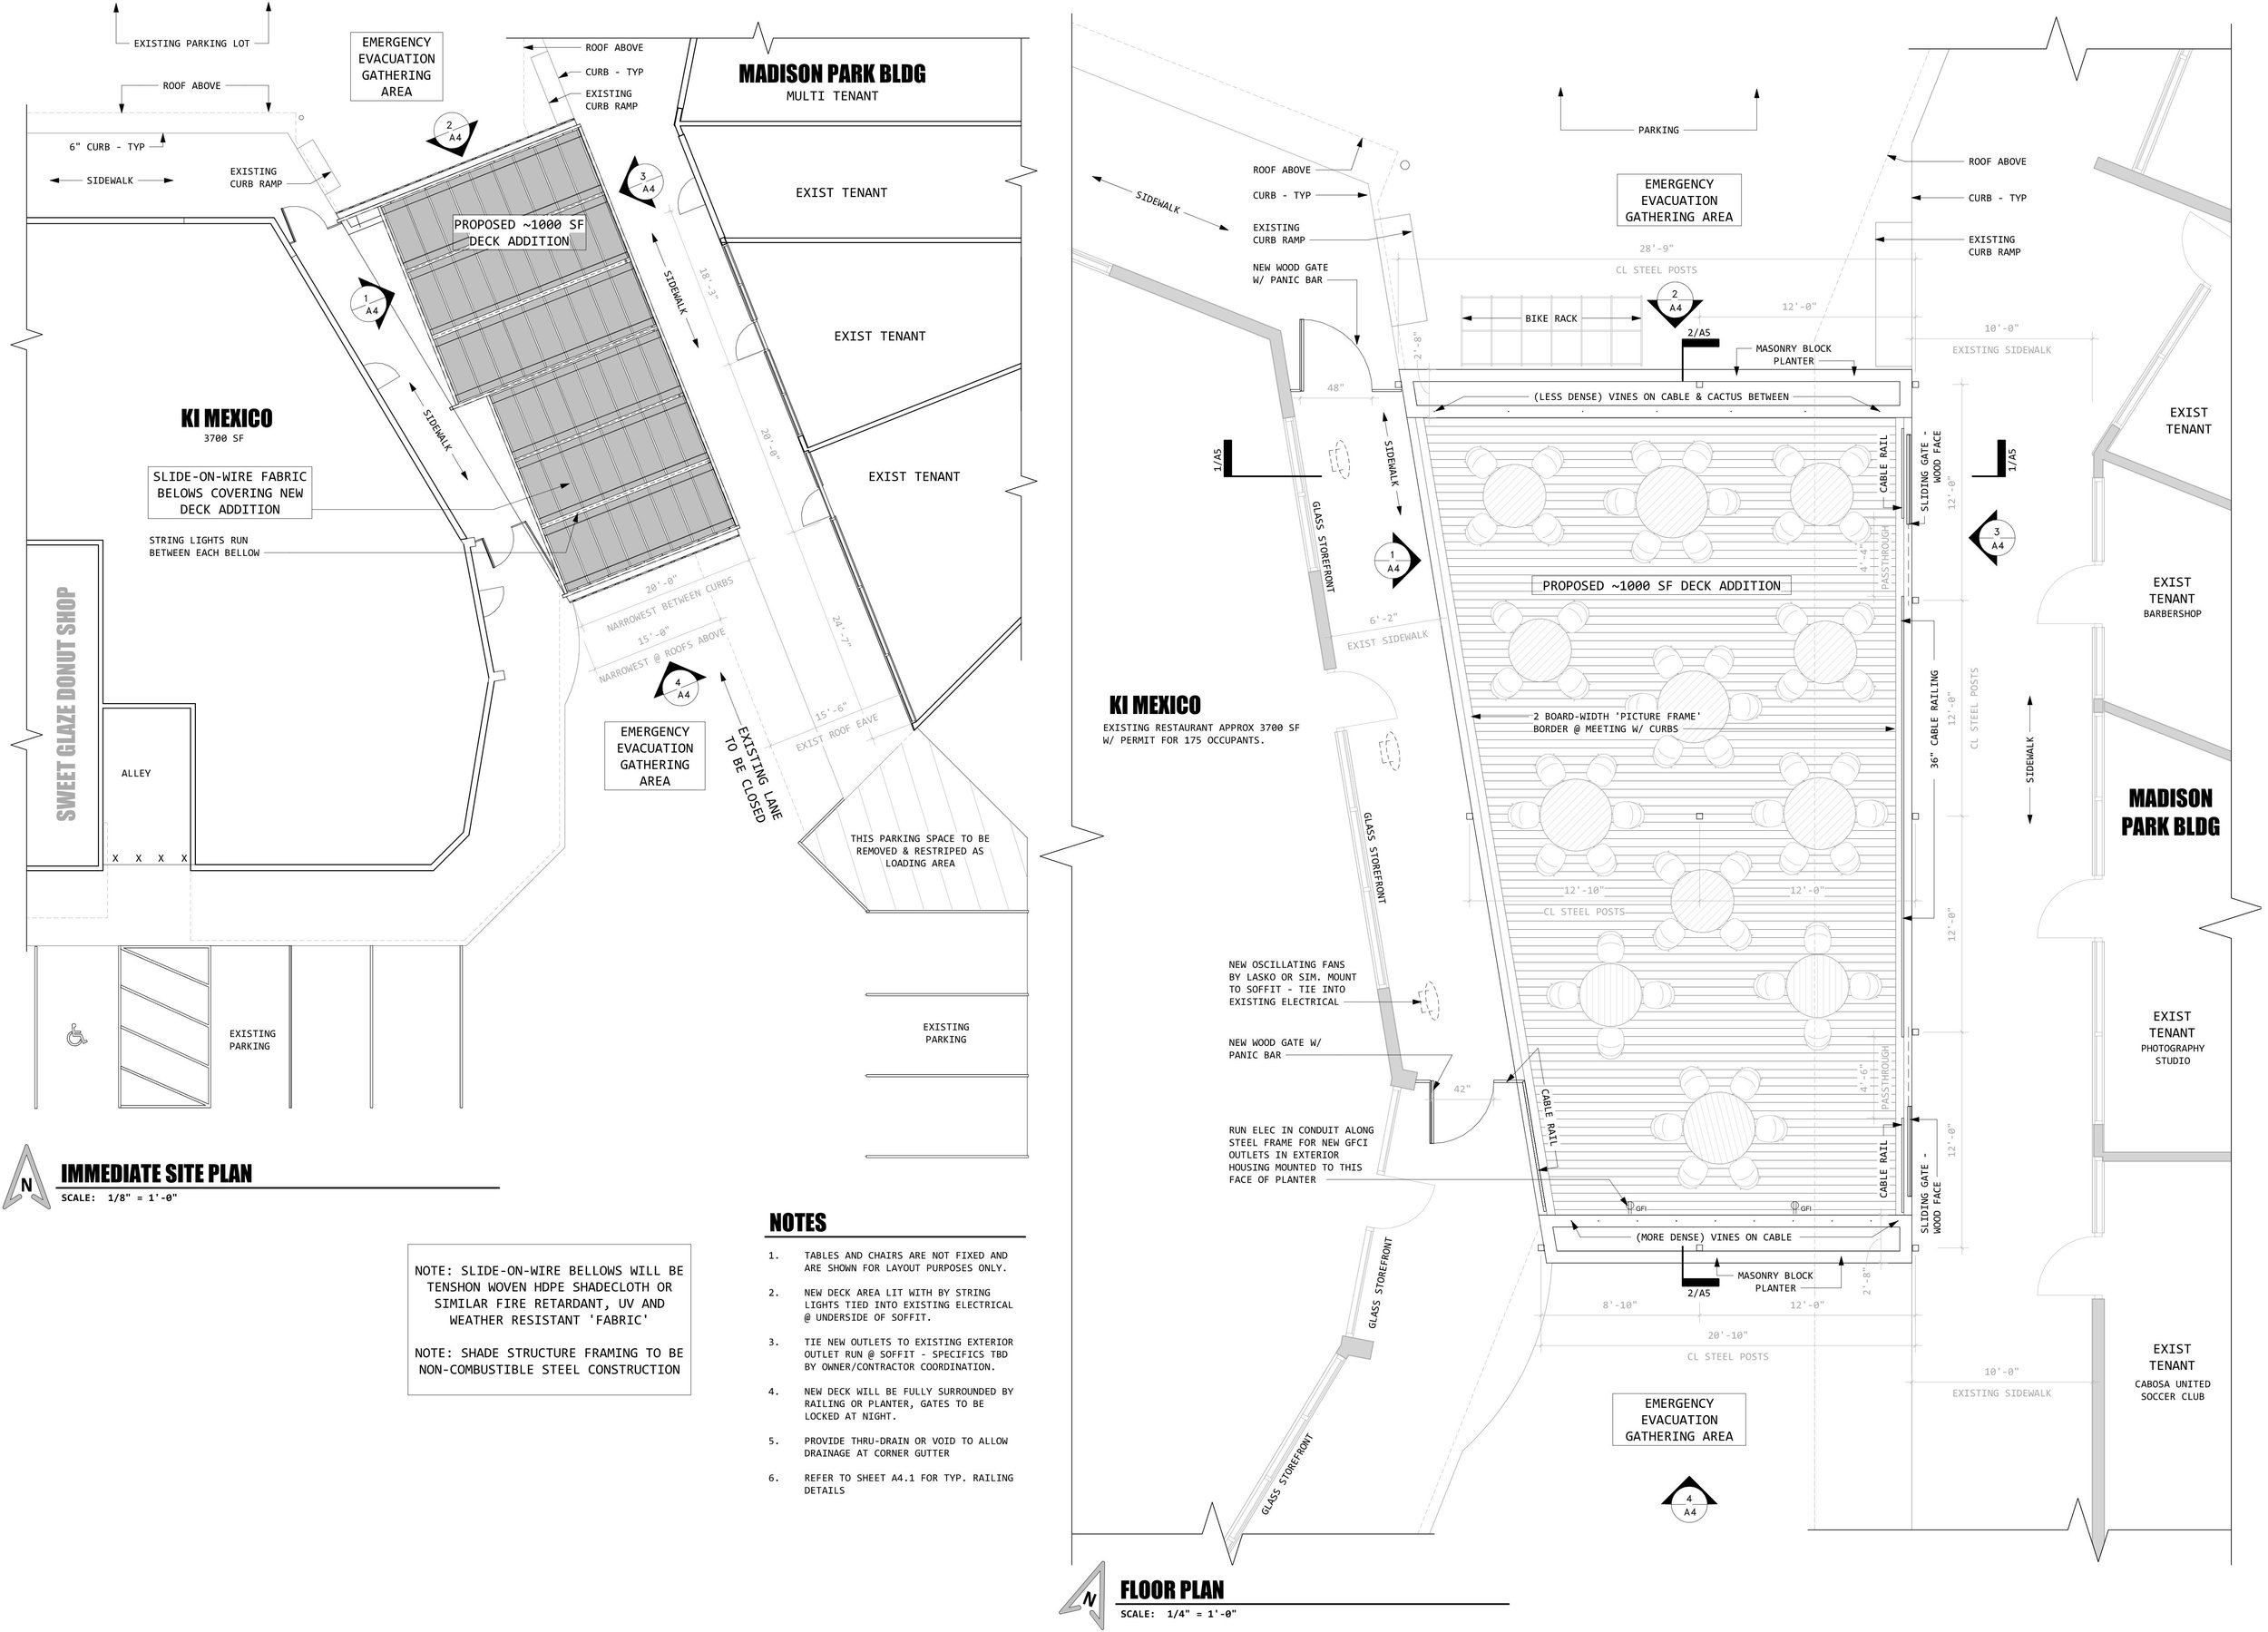
This project was a new outdoor dining addition to a favorite restaurant of mine (as well as many others who’ve eaten there), Ki Mexico in South Highland, Shreveport, LA. The goal was to provide a cool and comfortable environment that would help foster the already-booming ‘vibes’ Ki Mex has carefully curated.
One hurdle to this project was the proposed build area - it was located in an existing laneway that provided driving access between two buildings on the site. Though it was marked as a Fire Lane, after a careful analysis of the code, I determined this marking was unnecessary and that each building already had adequate access for fire trucks, etc, and that the lane was actually only a convenience lane. After this code analysis, I was able to present my findings and the proposed new patio to Shreveport city building permit bodies and get approval for the project to go ahead. Though this may seem a relatively simple task, those of you who have worked through ‘red tape’ issues like these know the amount of effort involved! I was very pleased to be able to assist in delivering this new breezy covered patio for Ki Mexico and hope it continues to be a celebrated space for the area.
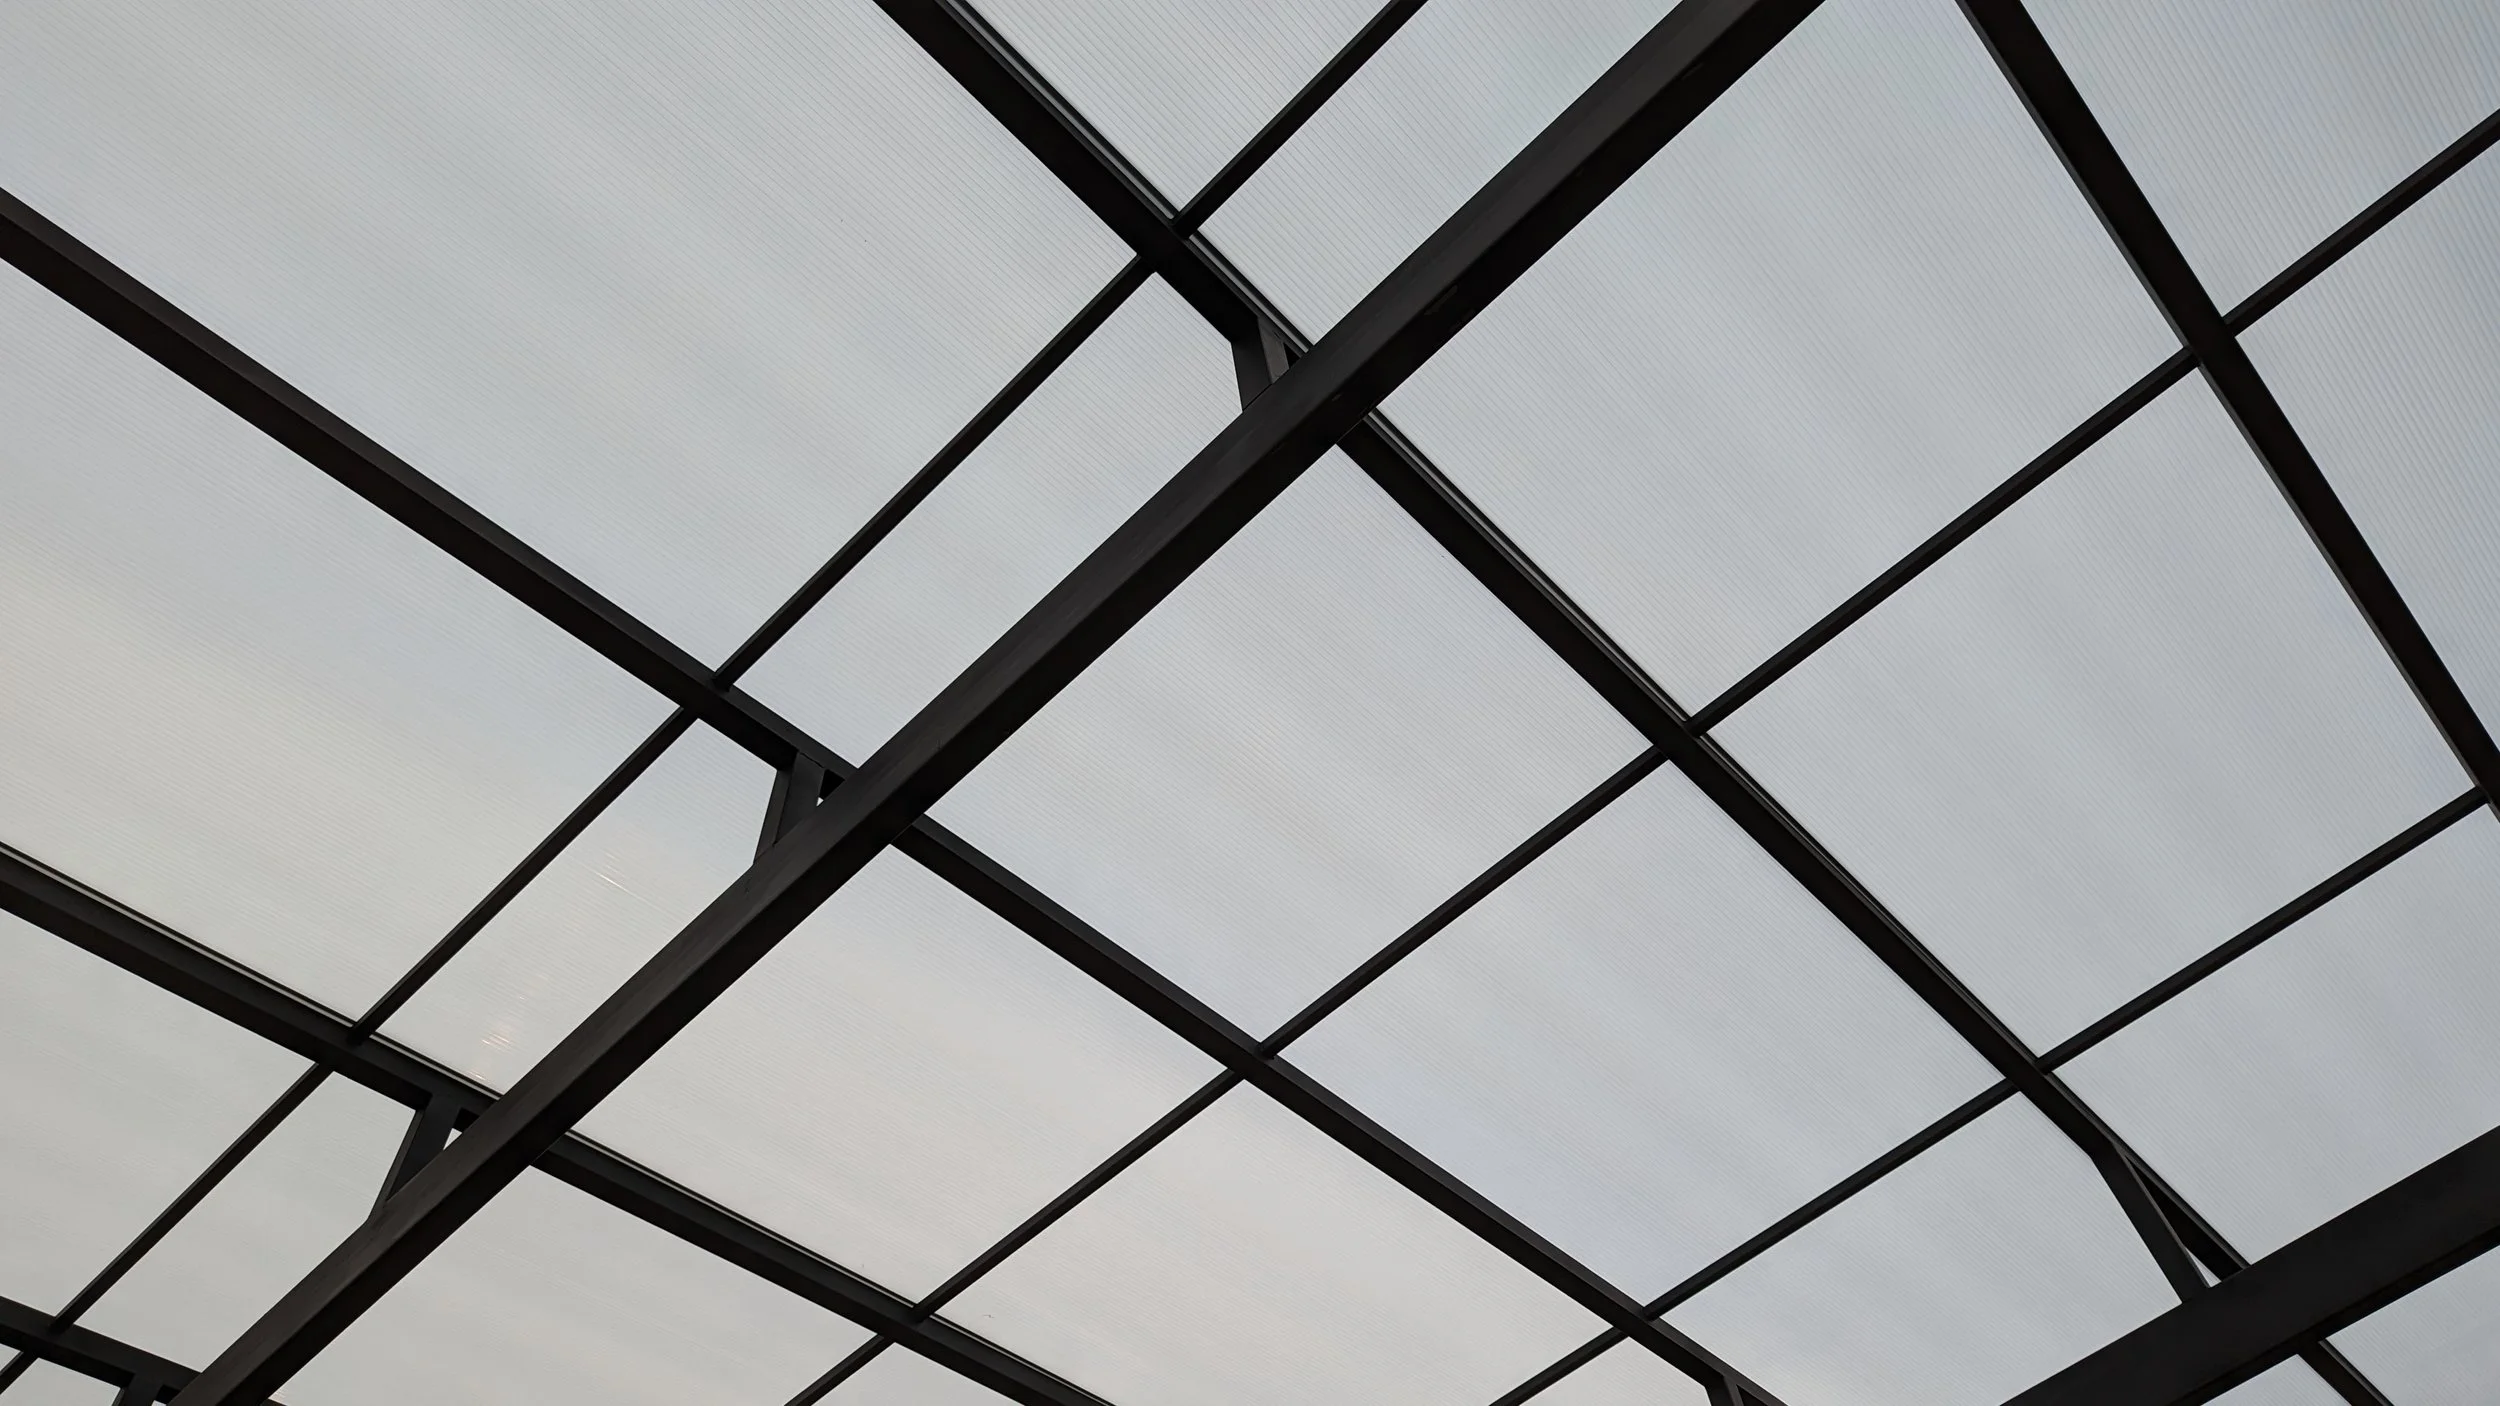
This structure is designed with a continuous vent at the roof ridge to allow heat to escape. This design, paired with the translucent PolyGal sheets as roofing material, allow plenty of natural light to the space while still accommodating the hot Louisiana weather. A slide-on-wire fabric bellows system is installed within each structural framing bay to provide shade on the hottest days while still enhancing the quality of the space. The wood deck is situated between two large planters that both provide a safety barricade from the adjacent parking area and accommodate a series of cables for vines to grow up and create plant-screening in both directions. This serves to create a secure, private and lush dining atmosphere. Ambient lighting strips on automatic timer hidden within the steel framing highlight the roof structure in the evenings, enhancing the ambiance of the space. The sliding gates along edge of project frame the space towards Ki, while still allowing passage through to adjacent small businesses.
This project couldn’t have had a better team - I coordinated with local metal fabricator Patrick McClannahan on the steel structure detailing. The roof is a modified space-frame and uses a combination of simple steel framing and fabbed 2x2 trusswork with vertical chords landing on perpendicular beams below. The combination serves to create an elegant exposed roof structure, highlighted with the contrast of white polygal roof panel above. Patrick provided fully welded connections at all joints, so the steel structure appears continuous. Local builder Thor Chevallier with Hammer&Bolt coordinated the construction of the planters, wood deck, installing roof panels and various other details. He and his crew went above and beyond to ensure quality-construction for the space, even going so far as scribing the wood deck boards along the face of split-face masonry planters. They also provided a hidden fastener deck system to match the welded connections, which means this project has 0 exposed fasteners visible. All told, this project came together very well and, based on usage, the community has been very happy with the final results!
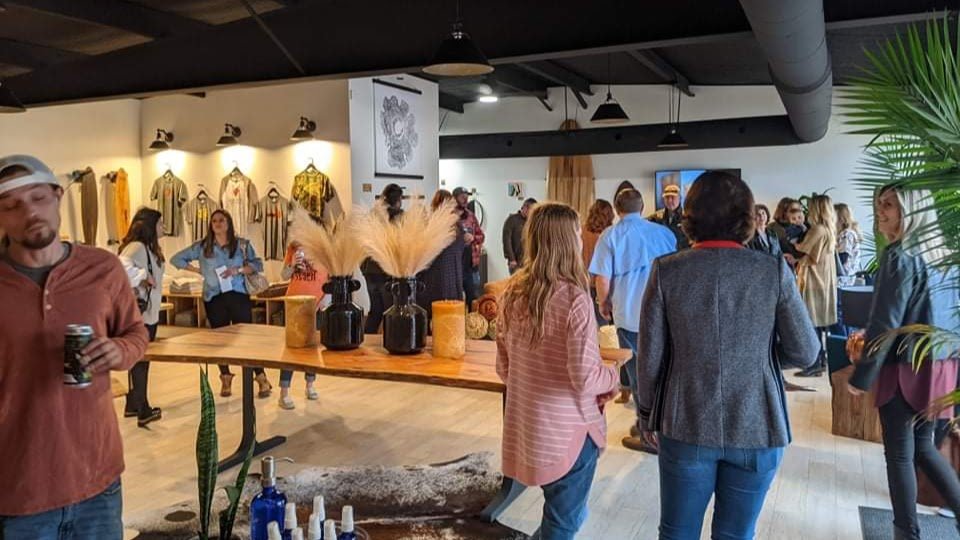
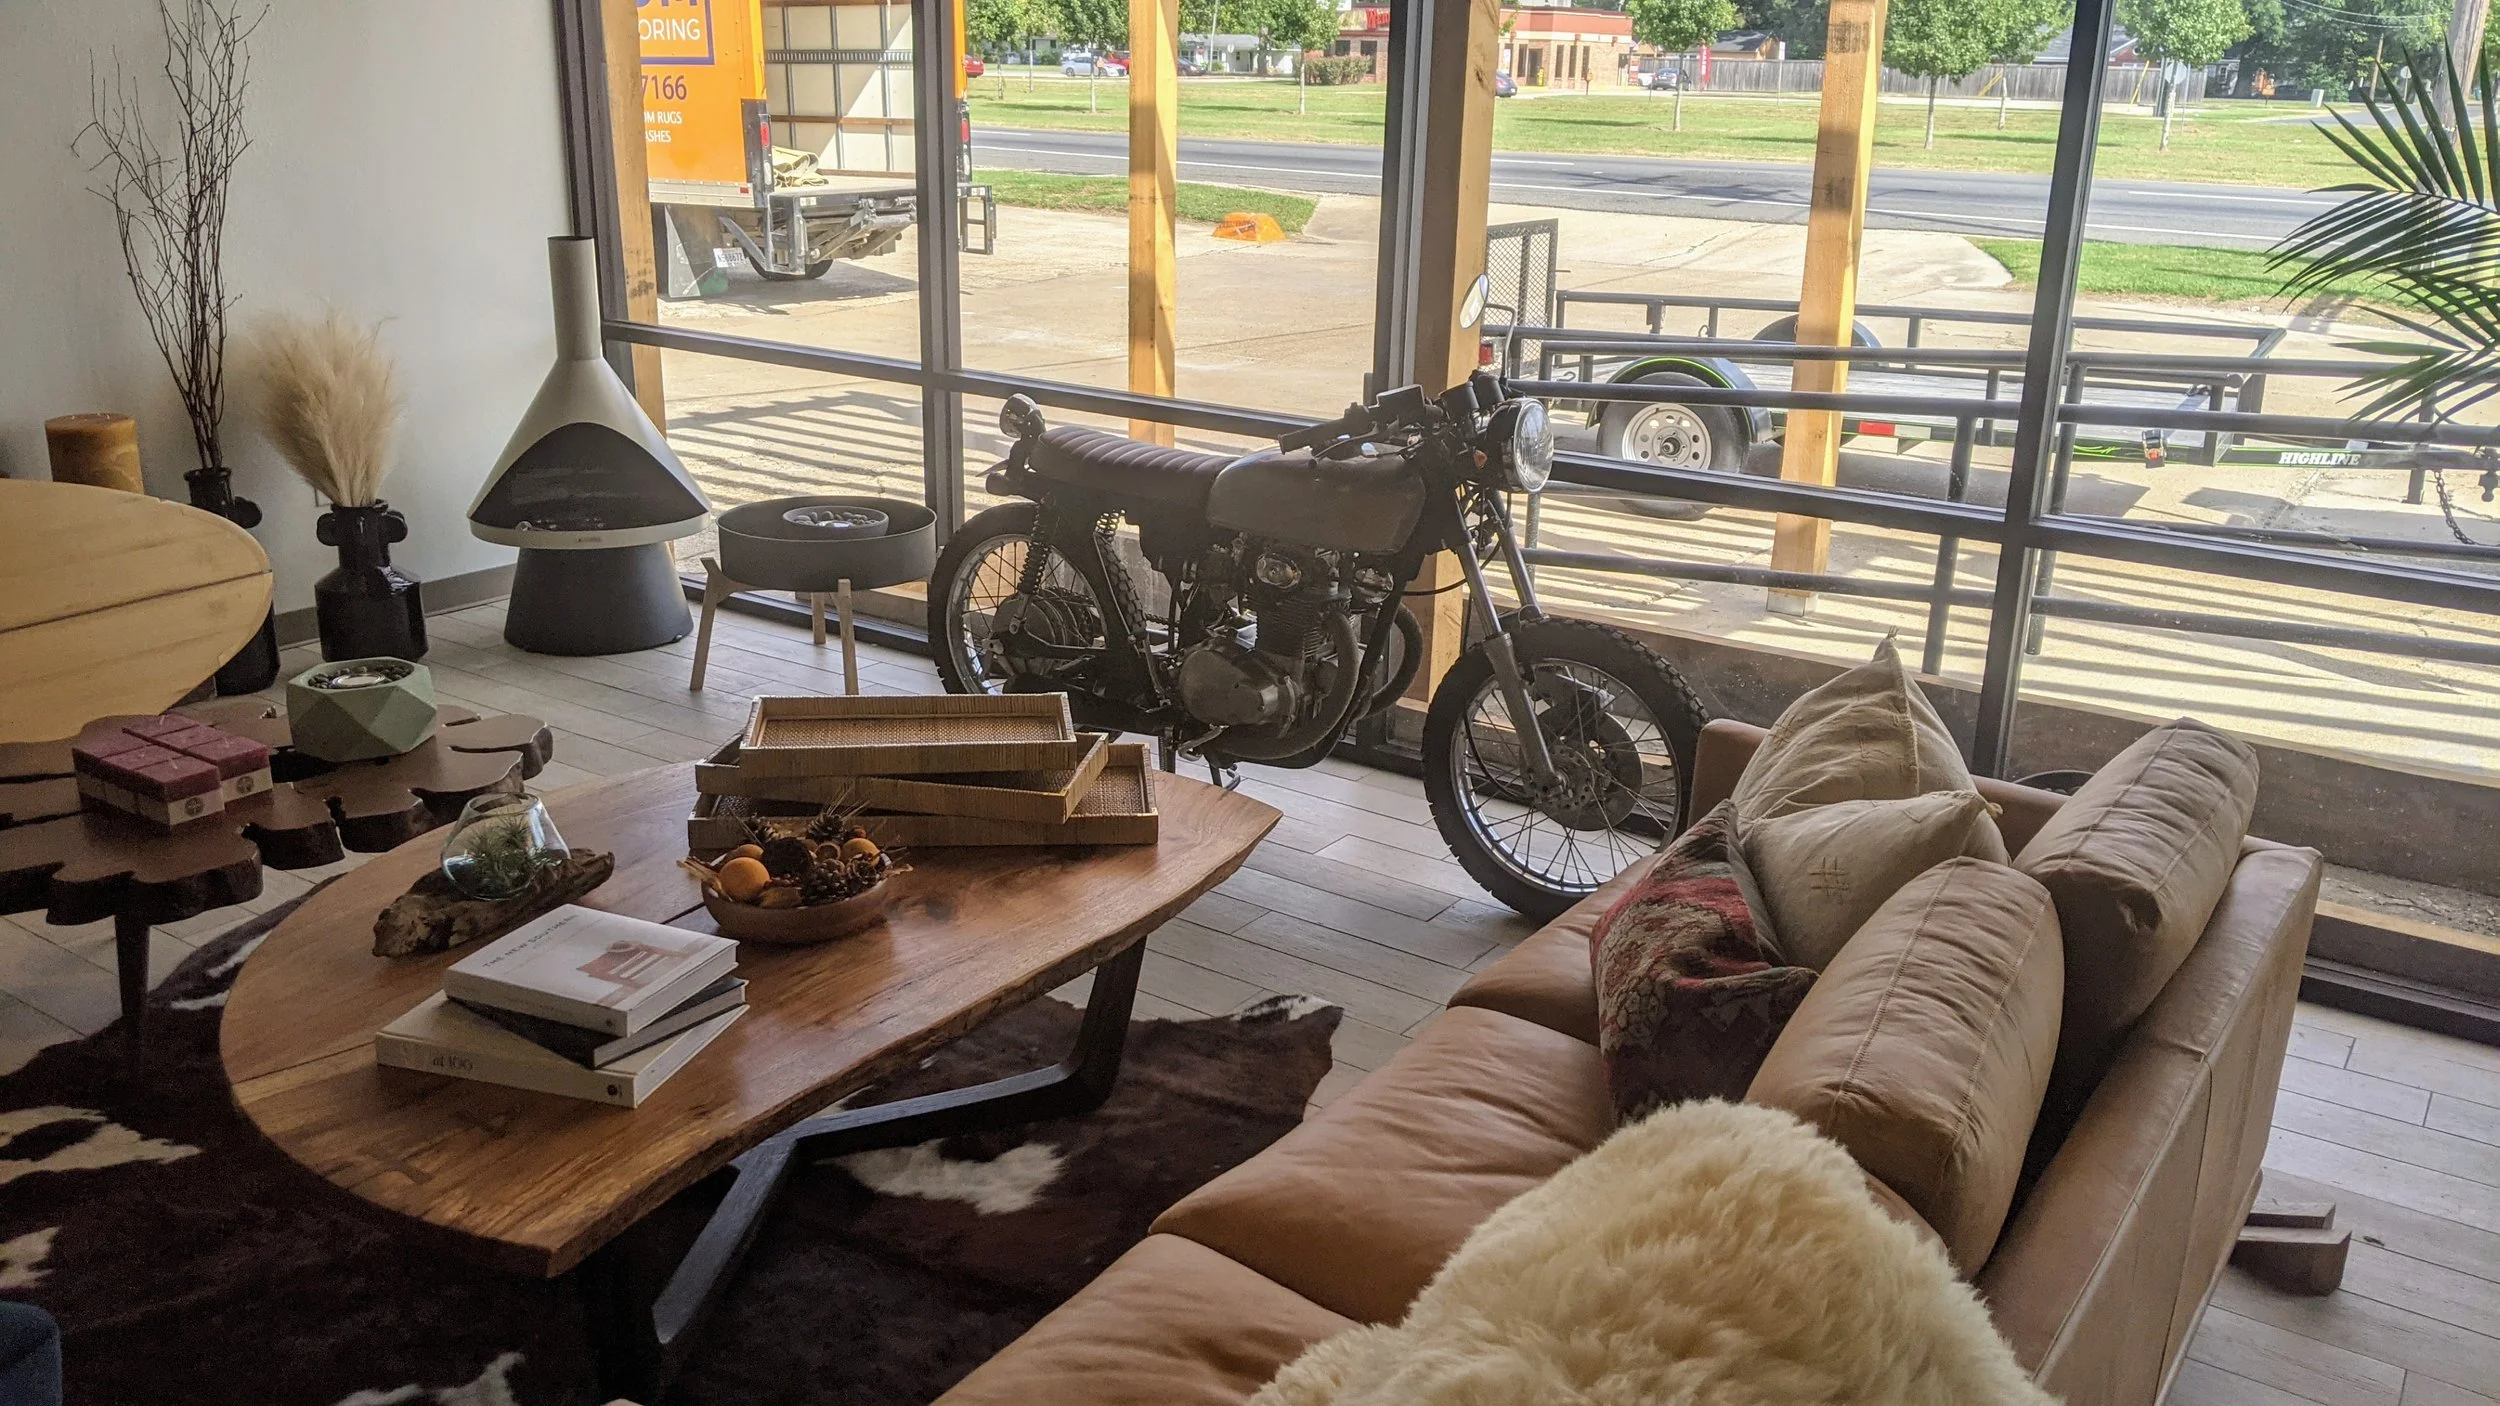
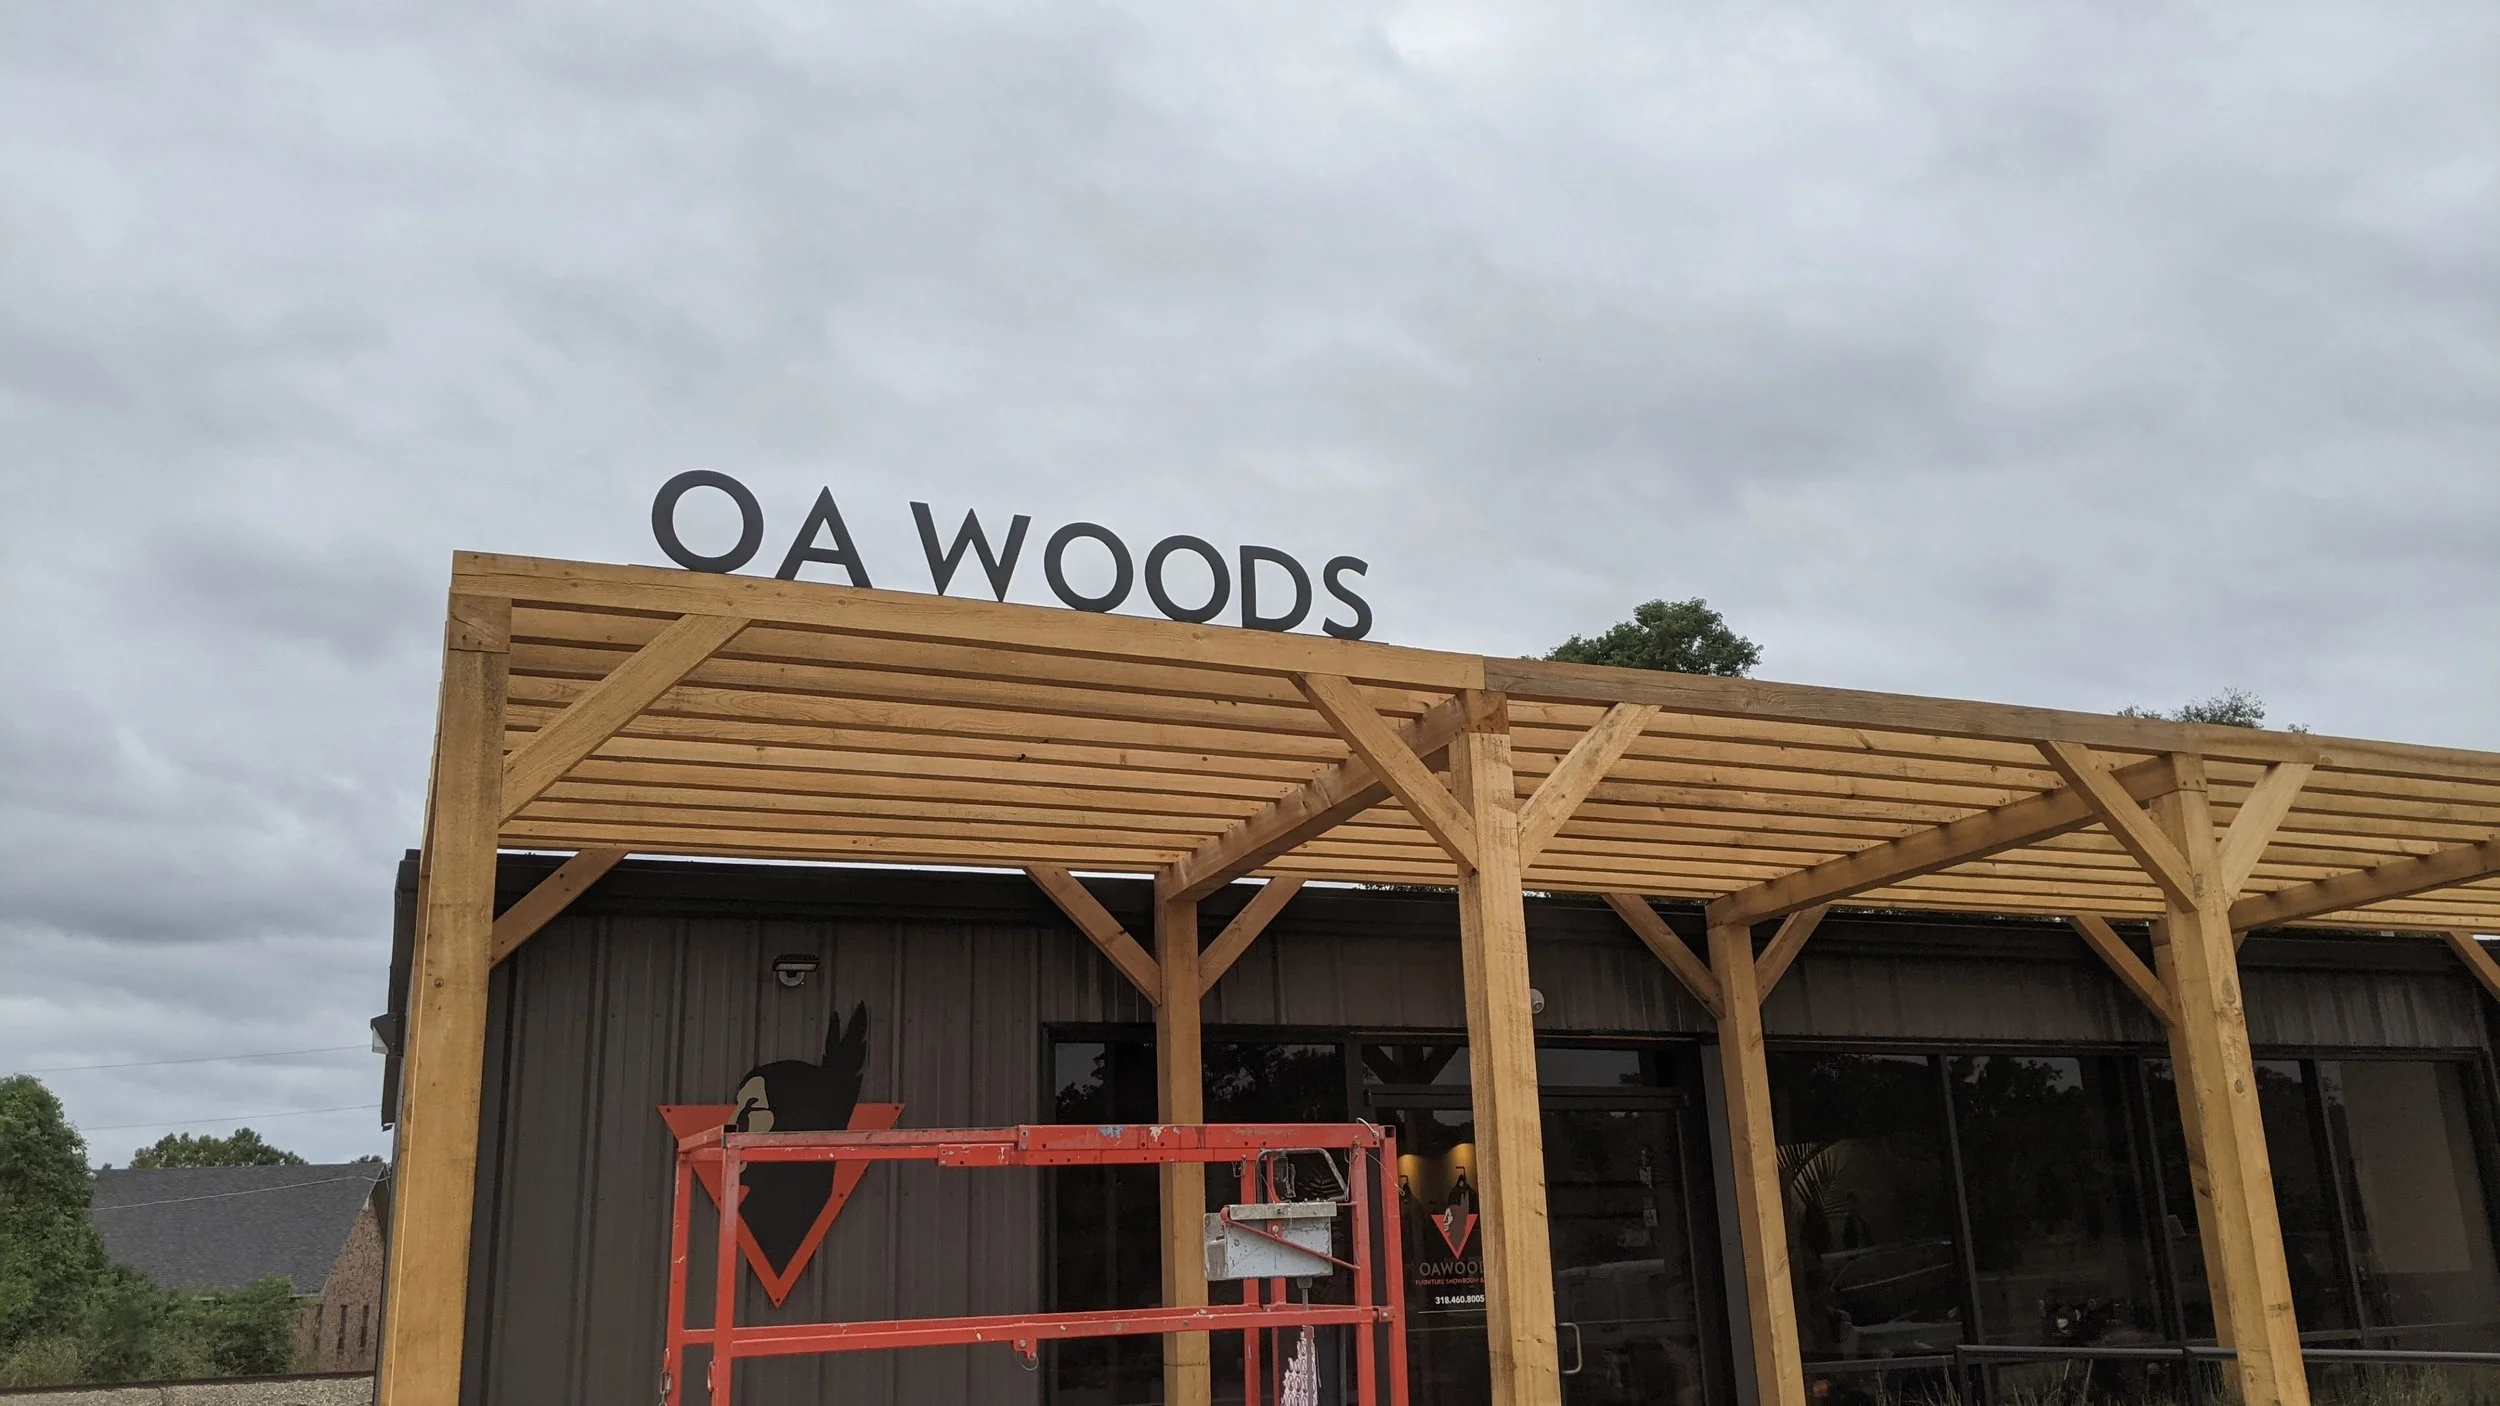
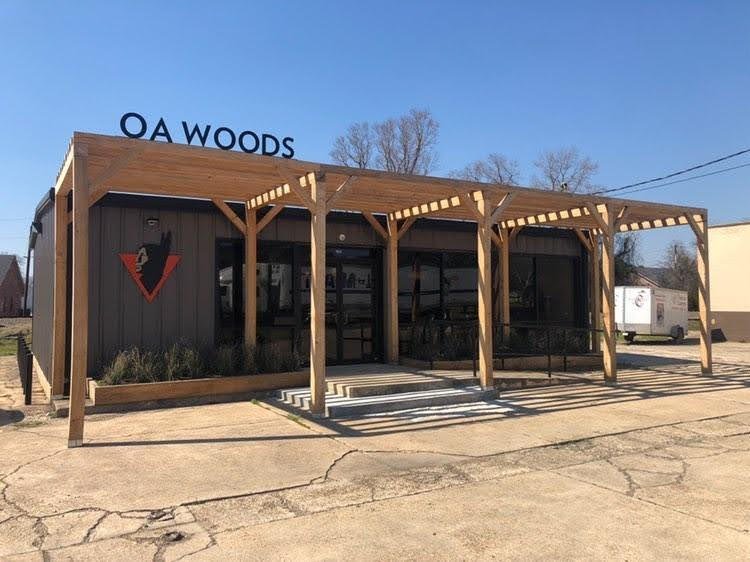
After moving back to North LA in mid-2020, I began working for myself - taking on whatever work I could find (sometimes not too glamorous!). In October 2020, my brother gave me a phone call and asked if I would be interested in helping him out at his woodshop in Monroe, @OuachitaAntiqueWoods - He was short handed, overbooked and needed help getting caught up. He also had some big plans for the coming year, with intentions to open a new Boutique storefront. I was happy to help out with his business and get to spend time in the wood shop.
Over the course of the next year, we worked together to catch up on work load, in the process getting the shop reorganized and renovated. Then hired on 2 new employees that have both become integral to the operation and began design and building the store. In October 2021 we opened the new storefront.
See images of the finished OA Woods Store, of which many building components were built in-house by us at the woodshop - as well as all the furniture for sale! These pictures are from opening week - the interior is continuously being updated as pieces come and go!
Also see video from our “Ribbon” cutting!
See more work from OA Woods shop on their website, Woodshop instagram or Store Instagram and see more of my work from my time there on the ‘Furniture’ page of this site!


This design is part of a series of quick ‘study’ home proposals made over the years. Click here to see the full series of these designs.
Hello all!
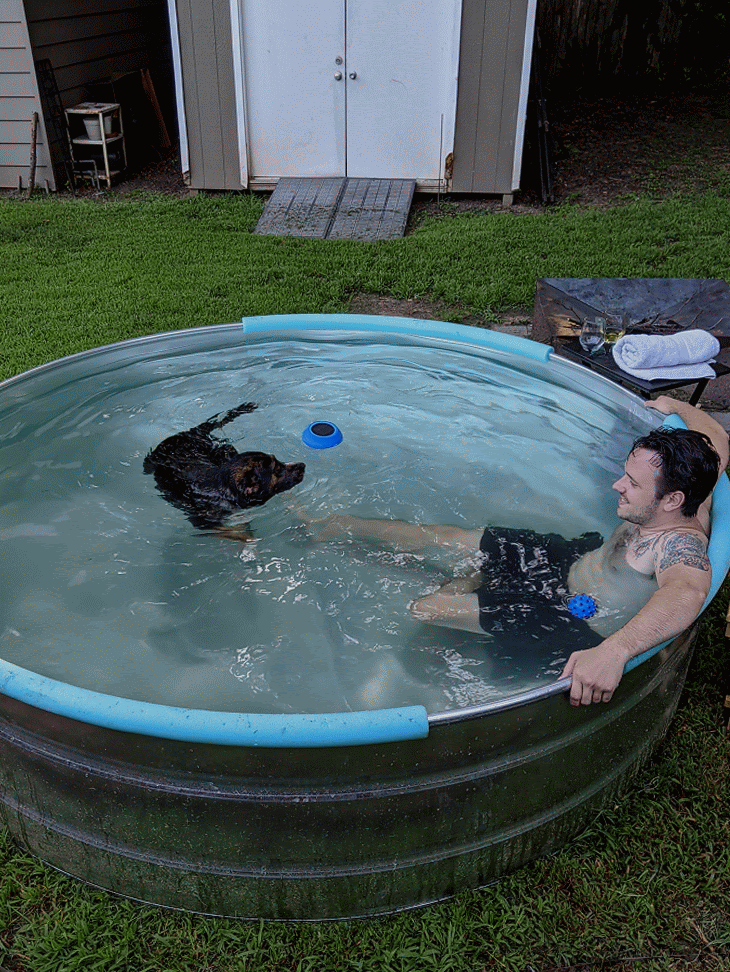
Writing this short blog post to show some images of a recent project in my own backyard.
I’ve been seeing a lot about ‘stock tank pools’ on instagram and other social media, and decided to dive in. See finished photos below and read a short writeup with process photos below that.
PROCESS:
Initially the idea was only for a cool spot to beat the heat during the rough Louisiana summers. But, as winter approached, I rigged the tank up with a lid and propane fired tankless water heater (see image 07 in gallery above) and have been using it as a hot tub! I’m very happy with how the project turned out and have enjoyed the process along the way.
An aside - big shout out to my best good buddy Zachary Coco for his help on the next few steps: digging the pad for the tank’s final location and building the deck.
I started with a simple 8’-0” stock tank (from Tractor Supply) and drilled a few holes in it to set that up with an above ground pool pump (by Intex). All of this set up was based on following a tutorial online by Stock Tank Pools. After setting it’s final placement, we went ahead and filled the tub for a few days to kill the grass underneath. After we enjoyed it for a few days, then drained it and I went to work setting it up in its final location.
BUILD PROCESS:
First, dig out the soils under the tank. (image 02 below) I dug the diameter of the tank +/- a few inches, and only about 2” deep. Just wanted to loosen the soil a bit and get any organic matter from the top layer. Then, we filled the hole back up with sand (image 03 below) then packed and levelled the new ‘pad’ for the tank. Once that’s done we did the same process placing deck blocks at the post locations. Then simply framed it all up with 2x8 joists (image 04 and 05 below), and laid 5/4” deck board (image 06)! The whole tank pad and deck build only took about 2 days over a weekend.
After this work was done, we set the pool up in its final location and reinstalled the pump, etc. After getting our enjoyment out of it for the summer months, I built a wooden lid (in 4 pieces) to keep out debris and let it sit for the winter. After seeing the lid finished, though, I realized how spa-like the tank looked. I remembered seeing others online who set their tanks up to be hot tubs, and I thought… “Well, I’ve come this far!” and ordered the parts to add a hot water heater and pump to the tank. The lid has done a great job of keeping the heat in and after a few trial runs I’ve dialed in the heater to get the water just right.
Overall, very happy with the setup and was such a fun build! Will likely end up moving our fire pit a few feet away, but that’s where it was before the build and where it’ll remain until I get around to moving it.
Check out this resource page (StockTankPools.net) that has ALL the info you need to get your own stock tank set up.
A little gif of Ava and I enjoying the pool on its initial set up!

PROCESS VIDEO - ARCH 335 DESIGN/BUILD
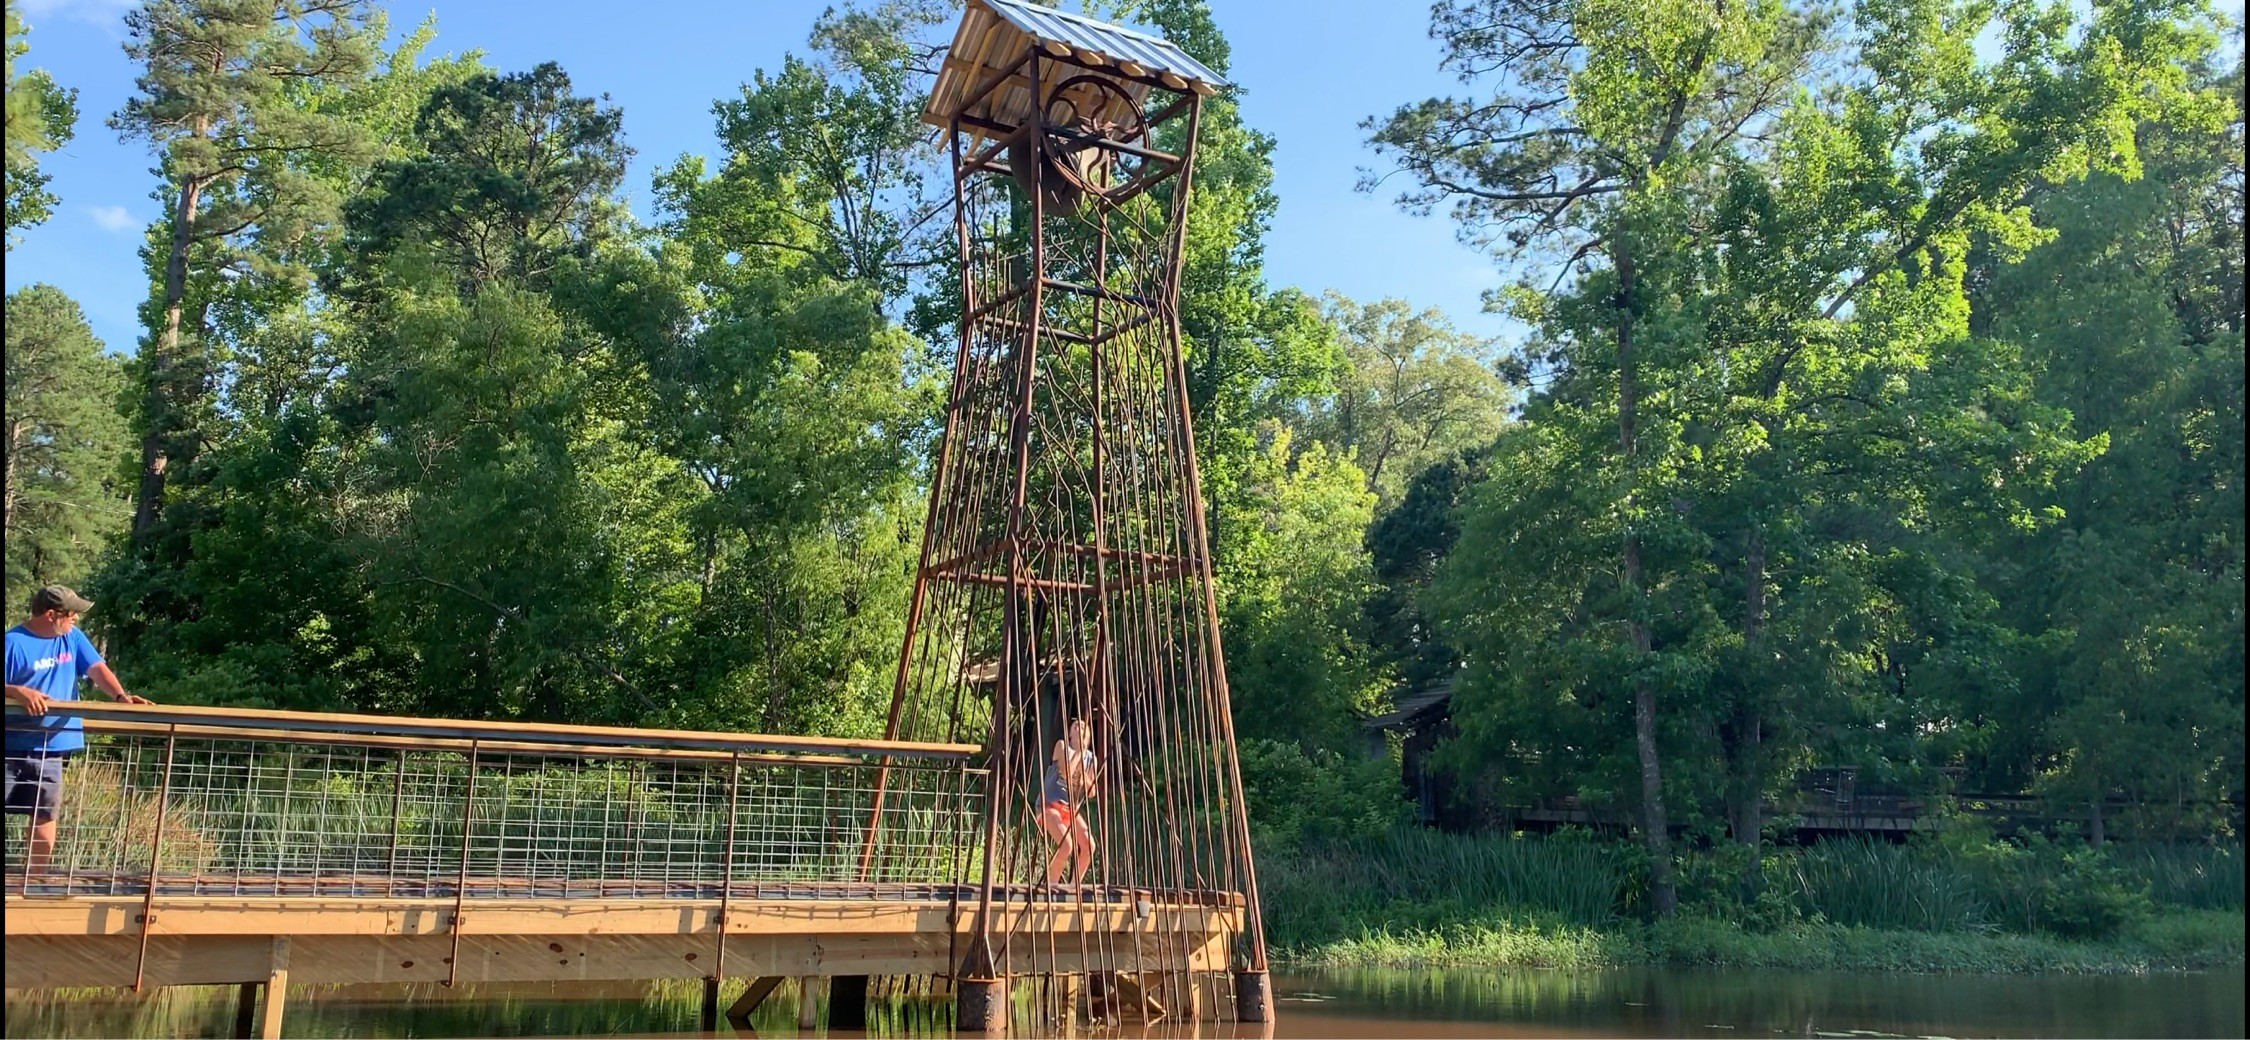
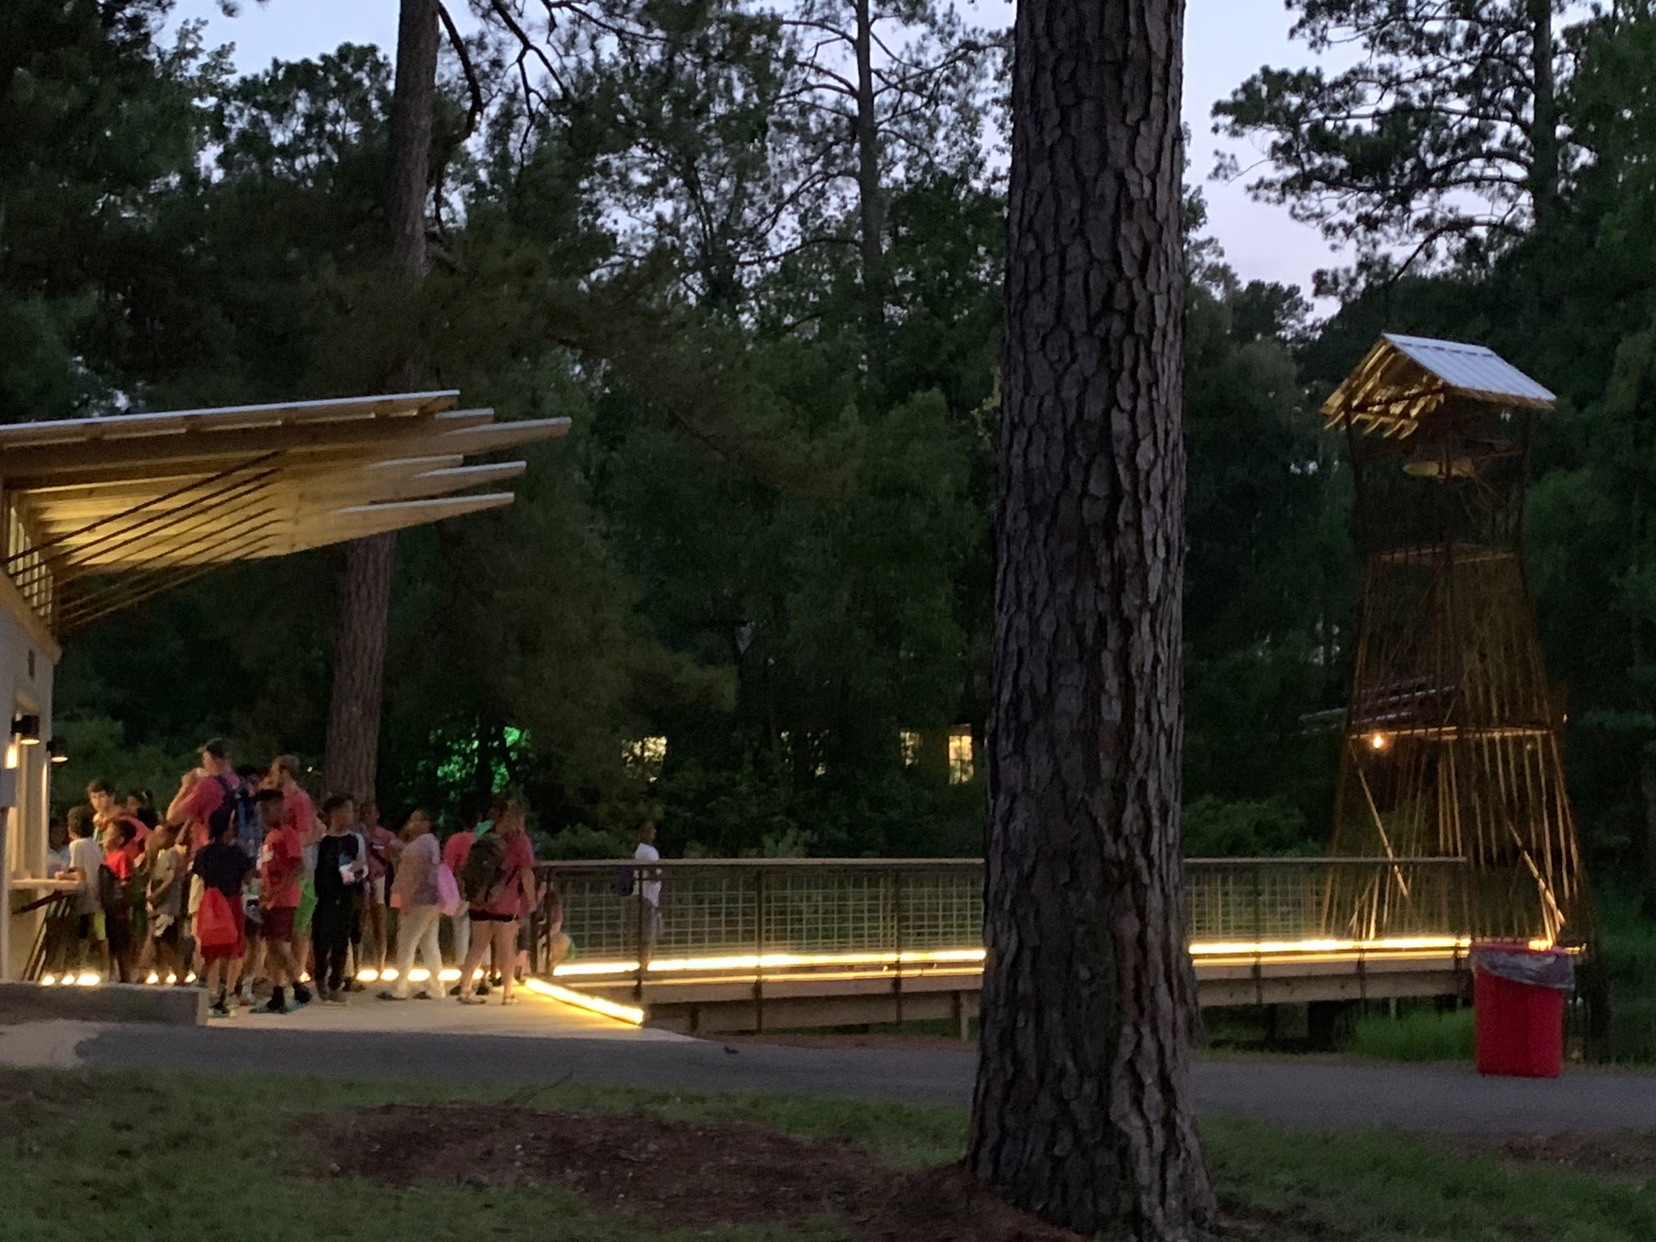
The Stroud Store (gate, store, and bell tower) were designed and built by 3rd-year architecture students at Louisiana Tech University in their ARCH 335 Design Build studio in the Spring of 2019 for Med Camps of Louisiana. The video below highlights the work put in over their 12 week course. Thank you Brad Deal for the leadership and excellent video editing!
DESIGN/BUILD - COMPLETED WORK:
The gallery of images below are taken after or near the completion the project.
Wow. It’s been a hectic couple of months and a long time since my last post.
Quick recap on the timeline of events in my life since early this year:
- In early February, I received an offer from Louisiana Tech University to participate as Adjunct Faculty for Spring Quarter 2019. I graciously accepted and spent the next 6 weeks finishing all that I could for my ongoing projects at KBA; including training the other staff at KBA in using Revit and prepping projects to be passed off to the other employees there.
- In Mid March, I began my new job at Tech. One of my classes was a Fabrication/Shop class, assisting students in using the Woodshop, Metalshop and CNC fabrications equipment available at Tech’s Art Annex. However, the main reason I was there was to co-teach Arch 335 Design/Build Studio alongside School of Design Professors Robert Brooks and Brad Deal.
If you’re unfamiliar with the Design/Build Studio at Tech, here are the cliff notes:
This class, taught each year by Brooks & Deal, is a 12 week ‘crash course’ where 3rd year architecture students design and build a structure at Camp Alabama in Choudrant, LA, which is home to MedCamps, a summer camp for special needs campers. Some previous works include a wonderful pavillion (Gibbs), a wheelchair accessible Kayak launch (Hero’s Launch), an accessible Archery & Paintball Range (Chaismus), a zipline (Peregrine) and a 300’ floating foot-bridge (Pisces) which connects the two halves of camp. You can watch the AIA ‘I Look Up” Film challenge winning video on Arch 335’s projects at Medcamp here, if you’d like to see more.
This years project, that I would be co-teaching, was just as exciting: we’d be building a Camp Store and Bell Tower. The store would be a renovation of an existing CMU structure. Formerly used for storage, it would now be a place for the counselors to give out snacks and prizes to campers. The Bell for the tower was donated from Ruston Methodist church, cast in 1885. It's ~2” thick of solid bronze, weighing in around 1400 lbs. It’s ring carries clear across the water, audible from the furthest reaches of Camp Alabama.
After several weeks in the studio iterating designs, we arrived on a scheme. The strategy included building large trusses that extend out past the existing face of the store, creating a covered area at the service window, and gesture out to the new Bell tower which would be situated out over the water, straddling a 50’ long pier. The bell tower would feature a 3/4” steel sucker rod screen infilling between the corner posts, beginning as an organized, linear pattern and branching out to become more chaotic as they worked up and around the facades. We would also be fabricating a new gate to Camp Alabama, presenting a newly minted logo to the adjacent highway.
All said, this experience was one of the most fulfilling I’ve had - and not only as an architect. The opportunity to bring joy and magic to campers who might otherwise never have experienced such is one I don’t take for granted. As always, it was a pleasure to be on site, building things with my own two hands - not just doing the drawings. But, it even goes beyond that - the opportunity to return to my alma-mater in a new position, interacting daily with students who are currently enrolled in the same program I went through, and pass on some of the skills and knowledge I’ve acquired since my graduation was an absolute privilege that I’m incredibly thankful for. Even after all the long hours - the blood, sweat and tears - and the literal tornado that tore apart the of Ruston in the middle of the quarter, I remain grateful for the opportunity and look back on it fondly.
See the albums above and below for images of the project during construction and after its completion.
DESIGN/BUILD - PROCESS PHOTOS:
The slideshow of images below are process photos from throughout the construction process.
Stay tuned for updates on my next chapter - a relocation to Little Rock, Arkansas!
Thanks for reading!
This recent project that was a big step outside of my comfort zone: a solidbody electric guitar. Specifically, a frankenstein telecaster with a walnut body. I composited the body shape from elements of a telecaster, a danelectro and a jaguar/tornado. Parts list and build photos below!
PARTS LIST:
Walnut body, made by yours truly. Body shape is a modified Telecaster, AKA Tele Frankenstein, AKA Frankencaster, with Danelectro and Tornado bits and pieces.
Toasted Maple modern/vintage Telecaster neck from Warmoth, stainless steel frets, white corian nut, and spezel type tuner drilling.
Fred Stuart “Lapwrap” Broadcaster Bridge Pickup
This was a cool item. A hand wound pickup from one of the original pioneers of the telecaster. Very solid quality, and it sounds amazing. Originally designed for a lap steel guitar, this is a really hot and bright sounding pickup. Compliments the minibucker in neck position very well.
Dimarzio DP240 “Minibucker” neck pickup
Standard vintage Tele Bridge, with brass saddles
Hip shot Grip-lock 18:1 geared tuners, staggered heights
Side note on this item - they are freaking awesome. I will likely be putting these on every guitar I own from here out. Not only do they lock the strings in place, which makes changing them a breeze, they allow for super fine tuning control. On top of that, they're very sturdy and the open gear look is so cool.
MISC
Dunlop Straplocks
non-fender Neck plate (I wanted a badgeless look)
Basic string trees
Basic steel string ferrules.
Basic Tele pickguard, modified using router and template in my woodshop.
Standard Control plate with cheap electronics for knobs and control plate. Ditched the cheap electronics (this was a cheaper option than buying each piece individually.
Deluxe wiring kit through Art of Tone:
-CTS 250K solid shaft taper pots (10% tolerance),
-CRL USA 3 position switch,
-Russian “paper in oil” capacitor
-Swithcraft Mono Jack
-22AWG tinned cloth push back wiring
copper tape for cavity insulation
After finding some CAD files of a telecaster online, I edited together some bits and pieces of a Tele, Jaguar and Danelectro to derive the final body shape.
After planing and jointing the boards, the next step was glue up. In retrospect, this would've been a great time to use clamping cauls! My blank was a little thin - the final guitar ended up being 1.5" thick, as opposed to the typical tele being 1.75". Thankful for the decrease in weight, though.
After sanding up to about 550 grit, and drilling all the holes for string ferrules, bridge attachment, etc.
This is after the second out of three coats of wipe-on poly. Lightly sanded with a 0000 steel wool pad between coats.
Copper shielding tape applied to in the inside of all cavities to prevent hum, radio interference, etc. Essentially a mini faraday cage.
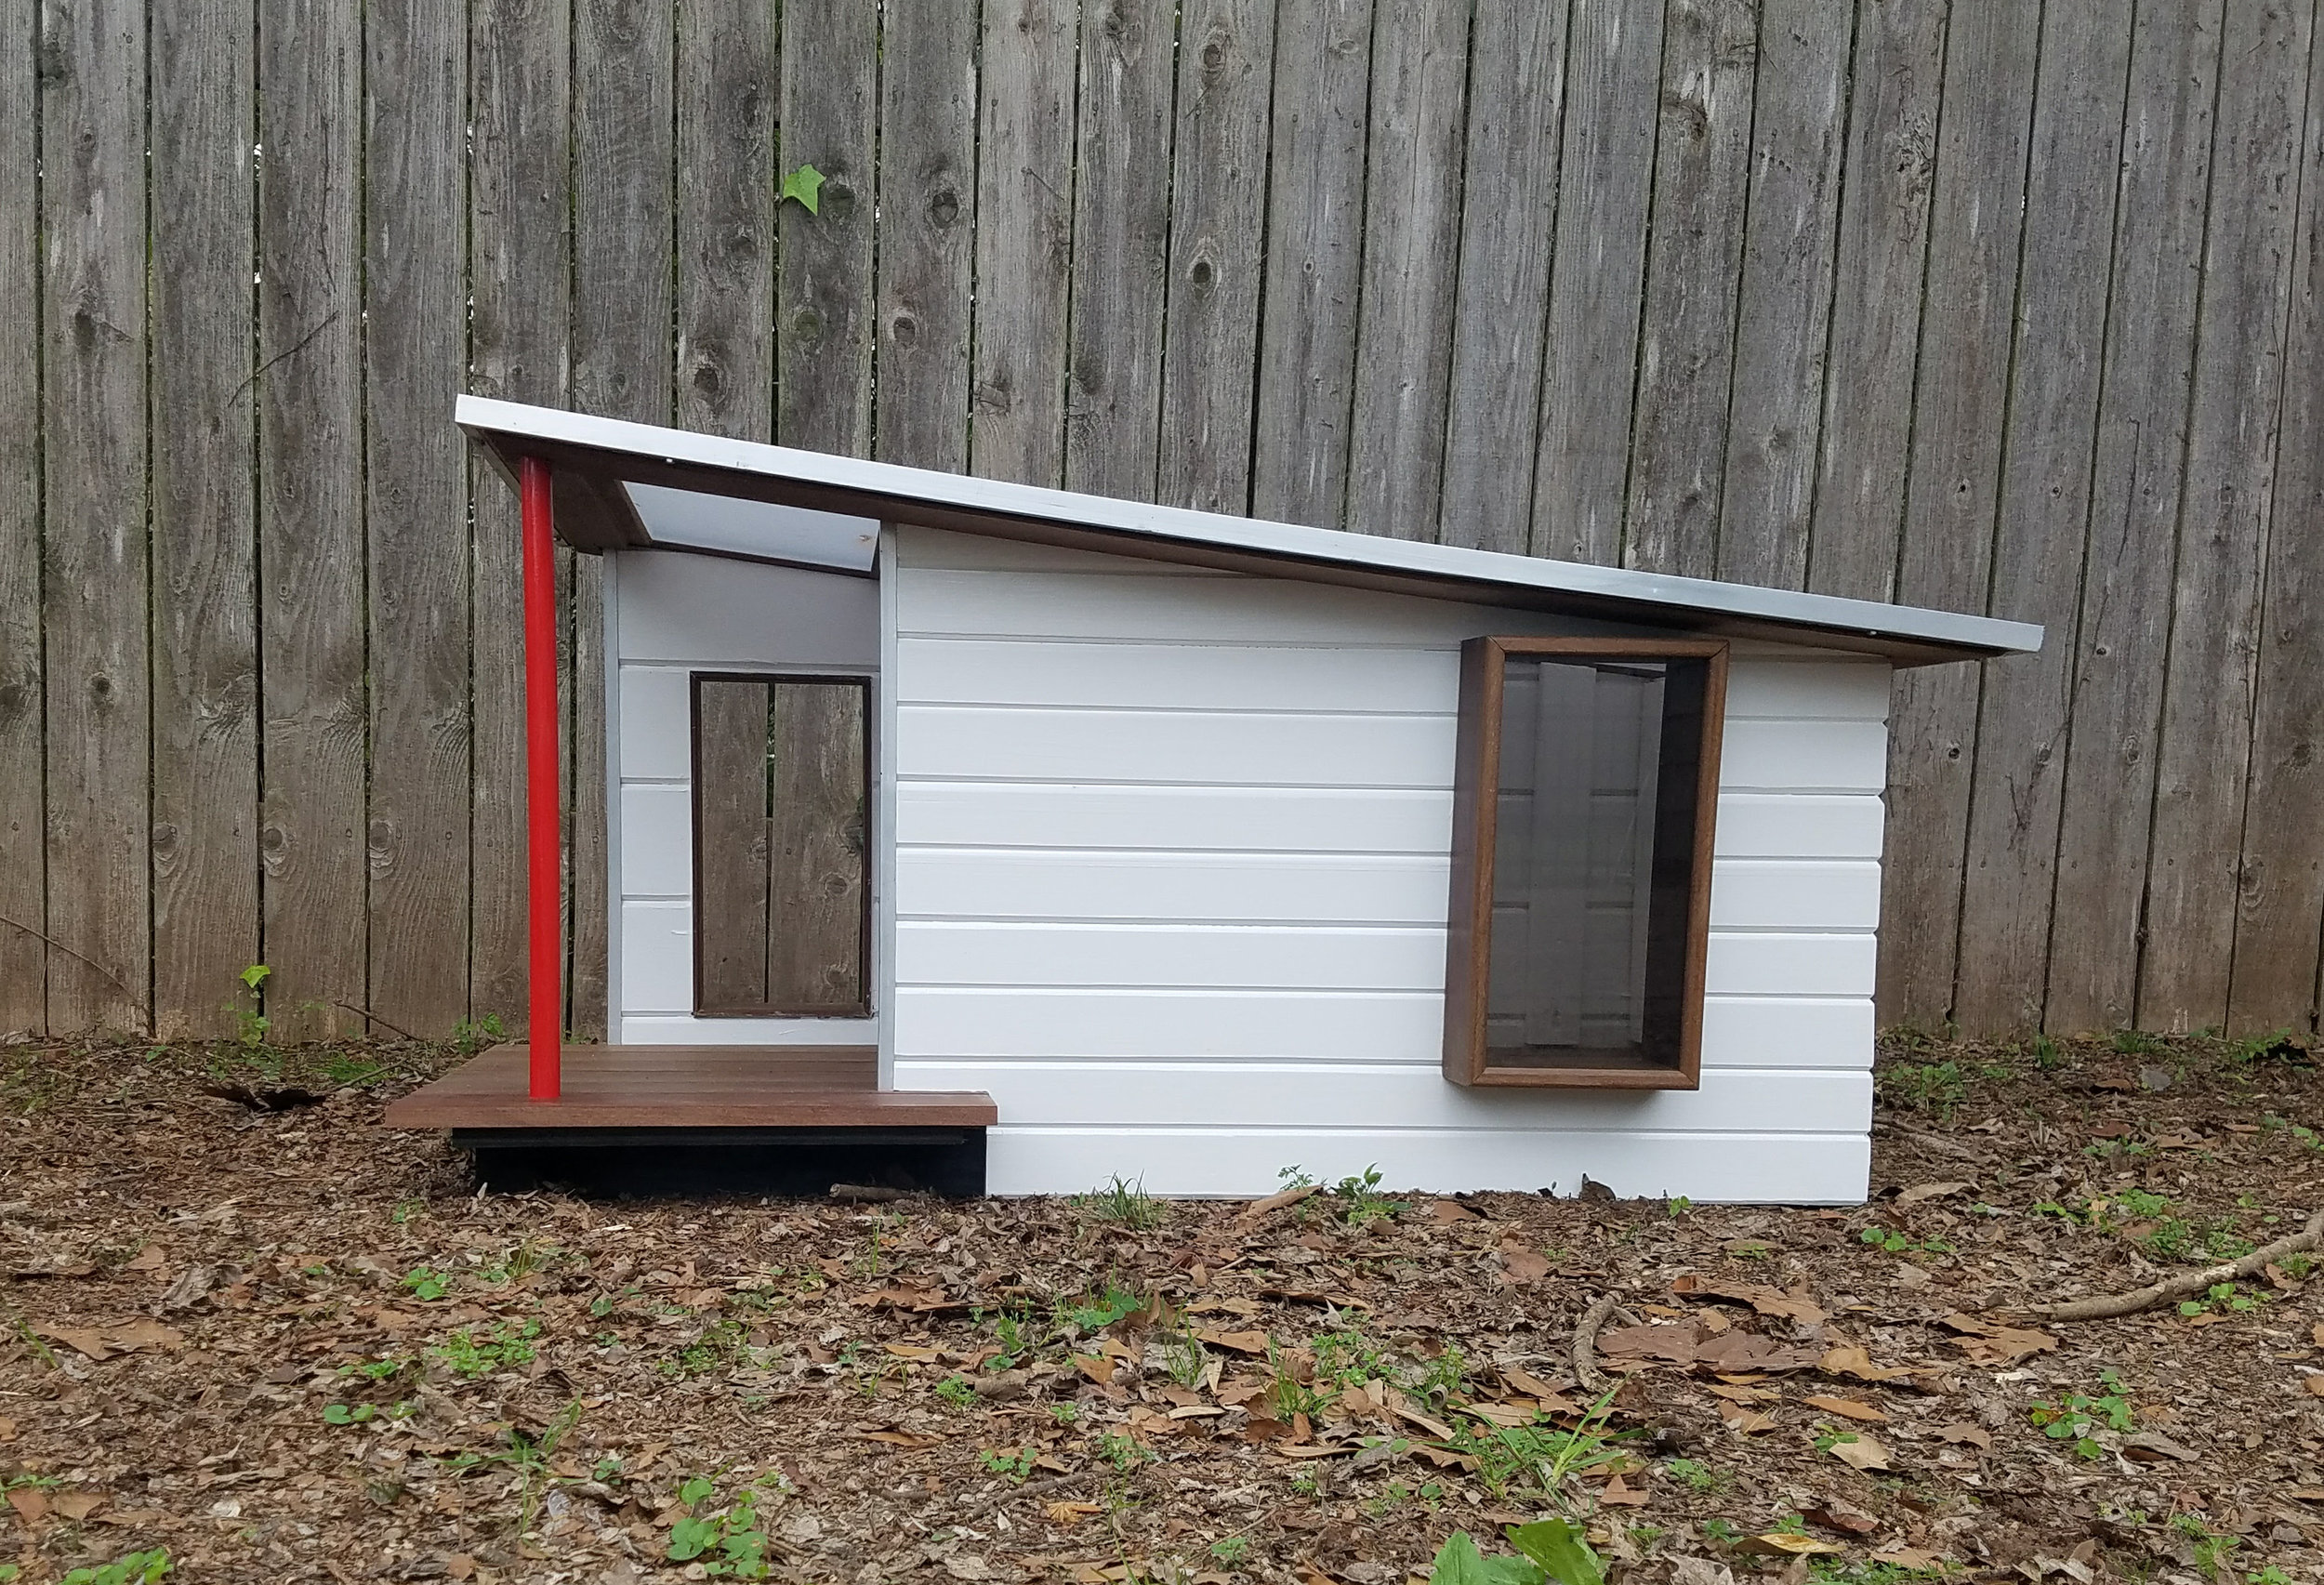
Hello All!
Writing to document this fun project. Earlier this year, my employer Kevin Bryan Architect and I worked together design this this custom doghouse in support of local animal shelter Robinson’s Rescue for this years Best-in-Sheaux event. The annual dog show and fundraising auction/raffle is held to help support the low-cost spay/neuter clinic and their work in our region. Kevin and I worked together on the design of the custom doghouse to mimic the work of historic local architects Samuel and and William Wiener, making it a Wiener (Dog) House! I built the doghouse in my shop/garage over the course of a few days.
Check out my dog Ava in the pictures below, and read more about Robinson’s Rescue HERE.